How to Streamline Your Workflow with Windows Taskbar Tricks
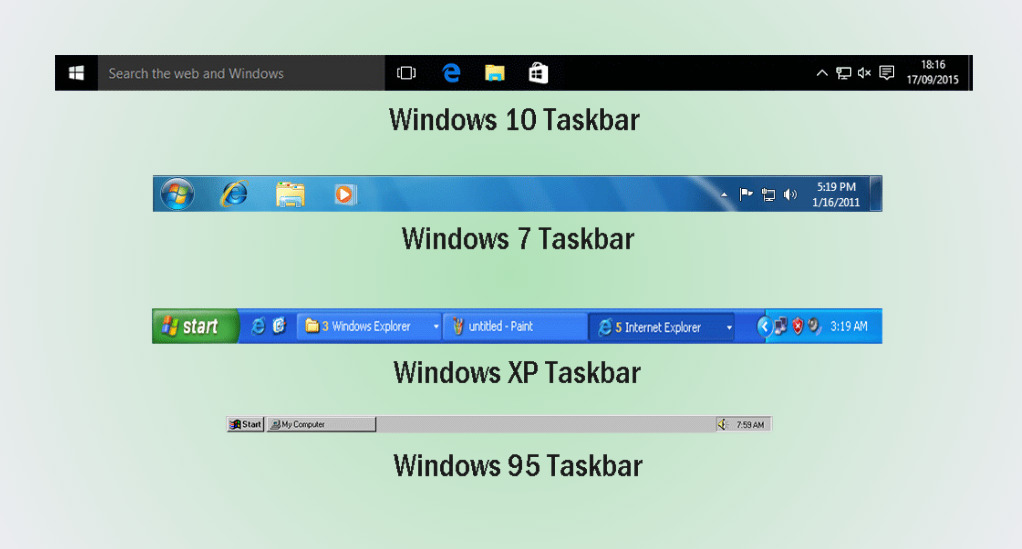
The Windows taskbar, a staple of the operating system since its early days, has undergone significant transformations over the years. From a simple strip at the bottom of the screen in Windows 95 to the dynamic and customizable bar we see in Windows 10 and beyond, the taskbar has always been at the forefront of user interaction. Yet, many users only scratch the surface of its capabilities. By diving deeper into its features and tricks, one can significantly streamline their daily workflow, making tasks quicker and more efficient.
A Brief History of the Windows Taskbar
| Windows Version | Key Features of Taskbar |
|---|---|
| Windows 95 | Introduced the taskbar and Start button. |
| Windows XP | Added the Quick Launch bar and grouping of similar apps. |
| Windows 7 | Introduced Jump Lists and Aero Peek. |
| Windows 10 | Brought in Cortana integration and virtual desktops. |
The taskbar’s evolution reflects Microsoft’s commitment to improving user experience. With each iteration, the company has introduced features aimed at making the taskbar more than just a place to pin apps or see open windows. It’s a hub of productivity, a command center from which users can launch apps, search for files, check notifications, and even get a glimpse of their calendar.
However, the true power of the taskbar lies in its flexibility. While the default settings are designed for general use, the taskbar can be tailored to fit individual needs, making it an indispensable tool for power users and casual users alike.
In this article, we’ll delve into some of the most impactful tricks to optimize the Windows taskbar, ensuring you get the most out of this powerful feature. Whether you’re a seasoned Windows veteran or a newcomer to the OS, there’s likely something here that can enhance your computing experience.
Moving the Windows Taskbar
The default position of the Windows taskbar is at the bottom of the screen. While this is familiar to most users, did you know that it can be moved to any edge of your screen? Depending on your workflow and personal preferences, changing the taskbar’s position might just be the tweak you need to enhance your productivity.
Why Move the Taskbar?
- Screen Real Estate: For users with widescreen monitors, vertical space is often at a premium. Moving the taskbar to the side can free up valuable vertical pixels, making it especially useful for reading long documents or web pages.
- Ergonomics: Depending on your monitor setup and seating position, having the taskbar on the side or top might reduce neck or eye strain. It’s all about finding the most comfortable position for frequent access.
- Aesthetic Preference: Sometimes, it’s just about giving your desktop a fresh look. Changing the taskbar’s position can provide a refreshing change to the usual layout.
Steps to Move the Taskbar:
- Unlocking the Taskbar: Before you can move the taskbar, ensure it’s not locked. Right-click on an empty space on the taskbar. If “Lock the Taskbar” has a checkmark next to it, click on it to unlock.
- Repositioning: Once unlocked, click and hold on an empty space on the taskbar. Drag it to your preferred edge of the screen—top, left, or right. Release the mouse button to drop it in place.
- Locking it Back: To prevent accidental movement in the future, it’s a good idea to lock the taskbar again. Right-click on it and select “Lock the Taskbar.”
Personalizing the Experience: Remember, there’s no one-size-fits-all when it comes to taskbar positioning. It’s about what feels most intuitive and efficient for you. Experiment with different positions for a few days and see which one you prefer.
Creating More Taskbar Space
As we continue to use our computers, the taskbar can become cluttered with pinned apps, open windows, and various system icons. A cluttered taskbar can slow down your workflow, making it harder to quickly access the apps and files you need. Fortunately, with a few tweaks, you can free up space and make your taskbar more organized and efficient.
Decluttering Tips:
- Minimize Cortana’s Presence: By default, Cortana’s search box takes up a significant portion of the taskbar. If you don’t frequently use Cortana, consider shrinking it down to just an icon or hiding it entirely. Right-click on the taskbar, hover over “Cortana,” and select “Hidden” or “Show Cortana icon.”
- Manage System Icons: Icons like network, volume, and battery can be hidden if they’re not essential for your daily tasks. Right-click on the taskbar, select “Taskbar settings,” and then click on “Turn system icons on or off” to choose which icons to display.
- Unpin Rarely Used Apps: Review the apps pinned to your taskbar and remove those you rarely use. Simply right-click on the app icon and select “Unpin from taskbar.”
- Use Small Taskbar Buttons: If you prefer a more compact look, you can use small taskbar buttons. Go to “Taskbar settings” and toggle on “Use small taskbar buttons.”
By taking the time to declutter and organize your taskbar, you’ll create a more streamlined workspace, allowing you to work more efficiently and with fewer distractions.
Reviving the Quick Launch Bar
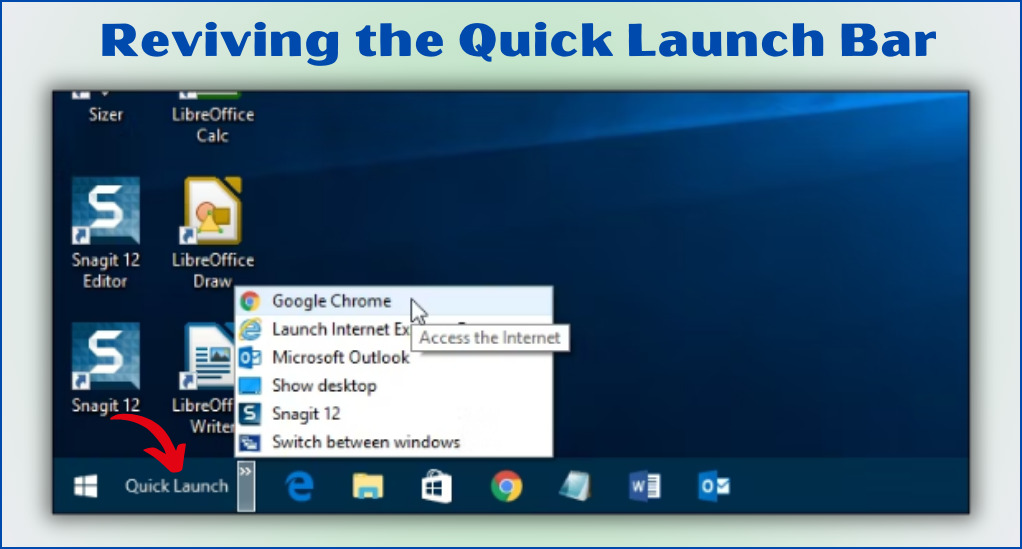
For those who have been using Windows since the XP and Vista days, the Quick Launch bar might bring back fond memories. This handy feature allowed users to access their most frequently used apps and files with a single click. While it’s not a default feature in modern Windows versions, the good news is that it can be reintroduced.
Benefits of the Quick Launch Bar:
- Quick Access: As the name suggests, the Quick Launch bar is all about speed. Pin your most-used applications and files for instant access.
- Less Clutter: Instead of having multiple apps pinned to the taskbar, the Quick Launch bar groups them together, saving space and reducing clutter.
- Customization: The Quick Launch bar is fully customizable. You can decide which apps to include, the order they appear in, and even their icons.
How to Bring Back the Quick Launch Bar:
- Right-Click on the Taskbar: Ensure it’s unlocked by checking that “Lock the Taskbar” is not selected.
- Add a New Toolbar: Hover over “Toolbars” and then select “New toolbar…”
- Enter the Path: In the folder field that appears, enter
%APPDATA%\Microsoft\Internet Explorer\Quick Launchand then click “Select Folder.” - Customize: The Quick Launch bar will now appear on your taskbar. You can drag to resize it, add or remove apps, and adjust its position as per your preference.
- Lock the Taskbar: Once you’re satisfied with the setup, don’t forget to lock the taskbar again to prevent any accidental changes.
Pinning Websites as Apps to the Taskbar
In today’s digital age, many of us rely heavily on web services, be it for communication, entertainment, or work. While bookmarks are handy, there’s an even quicker way to access your favorite websites—by pinning them as apps to your taskbar.
Advantages:
- Instant Access: No need to open a browser and then select a bookmark. Clicking on the pinned website launches it directly.
- Less Browser Clutter: By pinning frequently visited websites, you can reduce the number of bookmarks in your browser, making it easier to manage.
- App-Like Experience: Pinned websites open in a dedicated window, offering an app-like experience without any browser distractions.
How to Pin Websites:
Using Microsoft Edge:
- Navigate to your desired website.
- Click on the three dots (options) in the top right corner.
- Select “Pin this page to the taskbar.”
Using Google Chrome:
- Visit the website you want to pin.
- Click on the three dots (options) in the top right corner.
- Hover over “More tools” and then select “Create shortcut.”
- Ensure “Open as window” is checked and click “Create.”
Calendar Integration in the Taskbar
Time management is crucial in our busy lives, and what better way to stay on top of your schedule than by integrating your calendar directly into your taskbar? Windows 10 offers this nifty feature, ensuring you never miss an important event or meeting.
Features:
- Quick Glance: Click on the date and time at the bottom right of your screen to view a full month’s calendar.
- Event Creation: Add events directly from the taskbar by clicking on the small ‘+’ icon.
- Event Overview: Click on specific dates to see your agenda for the day, ensuring you’re always prepared.
Setting Up Calendar Integration:
- Click on the date and time on your taskbar.
- If not already signed in, you’ll be prompted to link your calendar account.
- Once linked, your events will automatically sync, and you can add, edit, or remove events directly from the taskbar.
By integrating your calendar into the taskbar, you’re placing your schedule at the heart of your desktop experience, ensuring maximum productivity and time management.
Enabling Desktop Peek
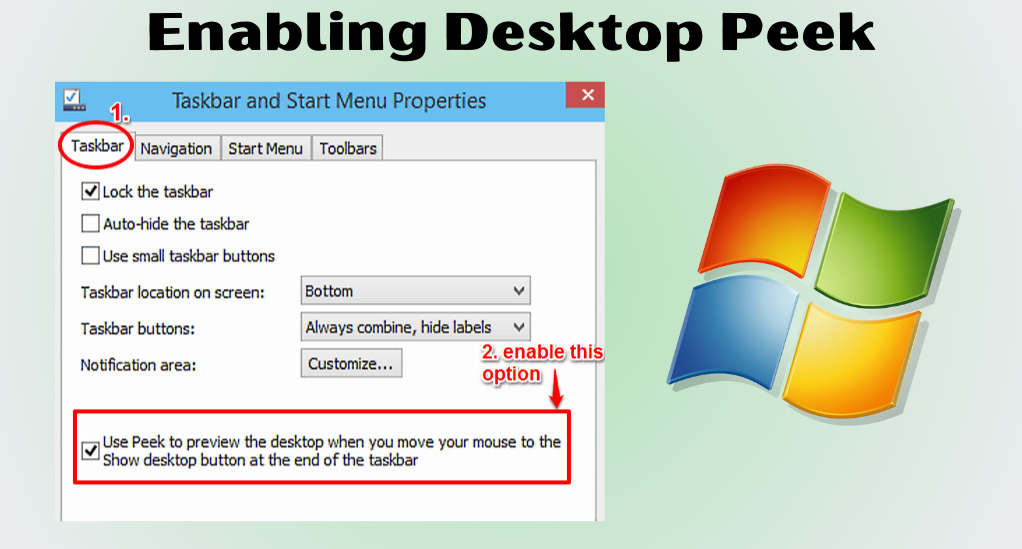
In the midst of multitasking, our desktops often get buried under a plethora of open windows. Sometimes, you just need a quick glimpse of your desktop, either to access a file or simply to clear the visual clutter. This is where the Desktop Peek feature comes in handy.
What is Desktop Peek?
Desktop Peek is a feature introduced in Windows 7 that allows users to temporarily make all open windows transparent, providing a clear view of the desktop. It’s a quick way to access desktop items without minimizing or closing any windows.
Benefits of Desktop Peek:
- Quick Access: Instantly view and access files or shortcuts placed on your desktop.
- Reduced Distractions: Get a momentary respite from the multitude of open windows and applications.
- Efficient Workflow: No need to minimize multiple windows just to access one file on the desktop.
How to Enable and Use Desktop Peek:
- Right-Click on the Taskbar: Navigate to “Taskbar settings.”
- Activate Peek: In the settings, scroll down to find the “Use Peek to preview the desktop when you move your mouse to the Show desktop button at the end of the taskbar” option. Toggle this setting on.
- Using Desktop Peek: Hover your mouse over the small vertical bar (or rectangle) located at the far right end of the taskbar. All your open windows will become transparent, revealing the desktop. To revert back, simply move your mouse away.
Diving Deep into Taskbar Settings
The Windows taskbar is not just about pinning apps or accessing the Start menu. Deep within its settings lie a plethora of options that can drastically change its behavior, appearance, and functionality.
Exploring Taskbar Settings:
- Auto-Hide: If you prefer a minimalist desktop, you can set the taskbar to auto-hide when not in use. It will reappear when you hover your mouse at the bottom of the screen.
- Jump List: This feature provides a list of recently or frequently accessed files when you right-click on an app in the taskbar. You can customize the number of items in this list or clear its history.
- Multiple Displays: For users with dual monitors, the taskbar settings allow you to decide how the taskbar behaves on multiple screens. You can choose to show the taskbar on both displays, only on the primary one, or even mirror its contents.
- Notification Area: Customize which icons appear in the notification area, and decide if you want to always show all icons or hide some.
Accessing Taskbar Settings:
- Right-Click on the Taskbar: Choose “Taskbar settings” from the context menu.
- Navigate Through Options: The settings menu is intuitive, with toggles and dropdowns for various features. Spend some time exploring and tweaking the options to fit your preferences.
Conclusion
The Windows taskbar, often overlooked, is a goldmine of features waiting to be explored. From its humble beginnings to the feature-packed bar we see today, it’s clear that Microsoft has continuously strived to make it a central hub of productivity. By mastering the tricks and tips outlined in this article, you can transform your taskbar from a mere tool into a dynamic workspace enhancer. Whether you’re a casual user or a power user, there’s always something new to discover, tweak, and optimize. So, dive in, experiment, and elevate your Windows experience to new heights.