Lightroom Watermark Mastery
In today’s digital world, photographs are more than just images; they’re a piece of your creativity and hard work. Whether you’re a professional photographer or an enthusiast, your photos are valuable. That’s where watermarks come in. They are like a signature on your artwork, a way to say, “This is mine.” But how do you add these essential marks to your photos without spoiling their beauty? Adobe Lightroom, a popular photo editing software, offers a simple yet powerful solution for this.
Watermarks in Lightroom are not just about claiming ownership; they are a subtle way of branding your work. Whether it’s a logo or just your name in elegant text, a watermark can make your photos stand out and protect them from unauthorized use. This guide will show you how to master the art of watermarking in Lightroom. From choosing the right type of watermark to applying it to your images, we will cover everything you need to know. So, let’s dive in and learn how to add that professional touch to your photos with watermarks!
Understanding the Need for Watermarks

In the digital age, where sharing images is as easy as a click, protecting your photographs becomes crucial. Watermarks serve as a line of defense for your work and a way to build your brand. Let’s explore why they’re so important.
Protecting Your Images Online
- Deterrence from Misuse: When you post photos online without any mark, they’re vulnerable to being used without your permission. A watermark acts as a barrier, discouraging unauthorized use.
- Tracking Your Work: Sometimes, your images can end up in places you never intended. With a watermark, those who come across your image can trace it back to you, ensuring you get the credit you deserve.
Enhancing Professional Branding
- Creating a Brand Identity: A watermark is more than just protection; it’s a branding tool. It can be your name, your business logo, or any symbol that represents your unique style.
- Consistency Across Platforms: By using a uniform watermark on all your photos, you establish a consistent brand presence, whether on social media, your website, or in print.
Legal Aspects of Watermarks
- Asserting Copyright: In many countries, a watermark is a visual indication of copyright. It serves as a legal statement that the image is your intellectual property.
- Legal Evidence: If you ever need to take legal action against someone who uses your work without permission, a watermark can serve as evidence that the work is indeed yours.
Preparing to Create Watermarks in Lightroom
Before you start adding watermarks to your photos in Lightroom, there are a few things you need to set up. This preparation ensures that the watermarking process is smooth and efficient.
Prerequisites and Initial Setup
To begin, make sure you have the following ready:
- Adobe Lightroom Installed: Ensure you have Lightroom installed on your computer. If not, download and install it from Adobe’s website.
- Select Your Images: Choose the images you want to watermark. It’s a good idea to start with a few samples to test your watermark design.
- Organize Your Workspace: Familiarize yourself with Lightroom’s interface. Know where the essential tools are, like the Export function and the Watermark Editor.
Text vs Graphic Watermarks: Choosing Your Style
Deciding between text and graphic watermarks is a critical step. Here’s a comparison to help you choose:
| Feature | Text Watermark | Graphic Watermark |
|---|---|---|
| Customization | High (font, size, color) | High (logo design) |
| Visibility | Can be more subtle | Can stand out more |
| Brand Representation | Good for names or simple branding | Ideal for detailed logos |
| Ease of Creation | Easier to create in Lightroom | Requires a pre-made logo image |
Text Watermarks:
- Simplicity: If you prefer a straightforward approach, a text watermark with your name or brand is easy to create.
- Customization: You can choose different fonts, sizes, and colors to match your style.
Graphic Watermarks:

- Brand Identity: A graphic watermark, like a logo, is perfect for photographers with established brands.
- Uniqueness: They stand out and can be more visually appealing, making your photos instantly recognizable.
Step-by-Step Guide to Creating a Text Watermark
Creating a text watermark in Lightroom is a straightforward process. Here’s a step-by-step guide to help you make a watermark that complements your photography without overpowering it.
Opening the Watermark Editor
- Start Lightroom: Open Adobe Lightroom on your computer.
- Access the Editor: In Lightroom, go to ‘Edit’ on the top menu (for PC) or ‘Lightroom’ (for Mac), then select ‘Edit Watermarks’ at the bottom of the dropdown menu.
- Watermark Editor Window: This will open the Watermark Editor where you can start creating your watermark.
Choosing Fonts and Styles
- Select Text Option: In the Watermark Editor, make sure ‘Text’ is selected as your watermark style.
- Type Your Text: Click in the text box and type the text you want to use – this could be your name or your business’s name.
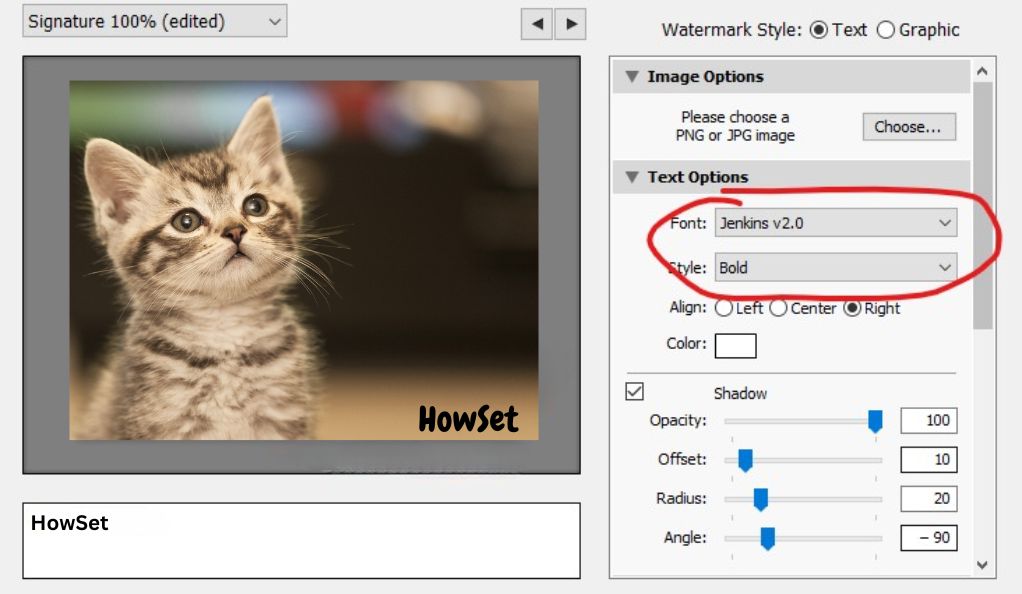
- Customize Font and Style:
- Font: Choose a font that represents your brand. You can select from a variety of fonts available in Lightroom.
- Style: Make adjustments to the font style, like bold or italic, if available for your chosen font.
Setting Opacity and Position
- Adjusting Opacity: Use the ‘Opacity’ slider to make your watermark more or less transparent. A less opaque watermark is more subtle.
- Positioning the Watermark: Decide where on the image you want your watermark. Common positions are the corners or along the bottom edge. Use the ‘Inset’ sliders to adjust the distance from the edge of the photo.
- Size and Anchoring: Adjust the size of your watermark to ensure it’s visible but not distracting. The ‘Anchor’ option lets you choose where the watermark sits on your image.
Saving Your Watermark for Future Use
- Save the Watermark: Once you’re happy with the design, click ‘Save’.
- Naming Your Watermark: Give your watermark a unique name so you can easily find it later.
- Applying to Images: Your new watermark will now be available to apply to your photos when exporting them from Lightroom.
Designing a Graphic Watermark in Lightroom
Creating a graphic watermark in Lightroom involves a few more steps than a text watermark, but it’s a great way to showcase your brand’s logo on your images. Let’s go through how you can add a unique graphic watermark to your photos.

Preparing Your Logo or Graphic
- Logo File: Ensure you have your logo or graphic saved as a PNG file. This format is best as it supports transparency.
- Transparency is Key: A transparent background ensures that only your logo appears on the photo without a blocky background.
- Size Matters: Before importing into Lightroom, ensure your logo’s size is appropriate. It shouldn’t be too large or too small, but just enough to be visible.
Adjusting Size and Transparency
- Importing Your Logo: In the Watermark Editor, select the ‘Graphic’ option, then choose your logo file.
- Resizing Your Watermark: Use the ‘Scale’ slider to adjust the size of your logo. Remember, it should be noticeable but not overpowering.
- Setting the Right Opacity: Adjust the ‘Opacity’ slider to get the desired transparency. A lower opacity watermark blends in more with the photo.
Strategic Placement for Maximum Effect
- Choosing the Right Spot: Place your watermark where it’s visible but doesn’t disrupt the focus of your image. Corners are typically a good choice.
- Using the Anchor Points: Lightroom’s Watermark Editor allows you to anchor your watermark to specific points in the photo. This ensures consistent placement across different images.
- Preview and Adjust: Always preview your watermark on different photos. This helps you see how it looks on various backgrounds and compositions.
Applying Your Watermark in Lightroom Classic
Once you have created your watermark in Lightroom Classic, the next step is applying it to your images. Lightroom offers flexible options whether you’re watermarking a single photo or a batch of images.
Watermarking Individual Images
- Selecting Your Image: First, choose the photo you want to watermark in the Lightroom Library.
- Exporting with Watermark: Go to ‘File’ > ‘Export’, this opens the export dialog. In the ‘Watermarking’ section, check the box and select your desired watermark from the dropdown menu.
- Finalizing the Export: Adjust any other export settings as needed, then click ‘Export’. Your image will be saved with the watermark applied.
Batch Watermarking: Efficiency for Multiple Images
- Selecting Multiple Photos: In the Library module, select all the photos you want to watermark. You can click and drag to select a range or hold ‘Ctrl’ (or ‘Cmd’ on Mac) to select individual photos.
- Bulk Exporting: With all your images selected, go to ‘File’ > ‘Export’. In the export settings, choose your watermark from the ‘Watermarking’ section.
- Export in Batches: After setting your watermark, click ‘Export’. Lightroom will apply the watermark to all selected images during the export process.
Adjusting Watermark Settings on the Fly
- Editing Existing Watermarks: If you need to make quick adjustments to a watermark, go back to the Watermark Editor (‘Edit’ > ‘Edit Watermarks’).
- Making Changes: Modify the watermark as needed – adjust size, opacity, position, etc.
- Saving Adjustments: Save the changes. Lightroom updates the watermark for future exports.
Advanced Watermark Techniques
For those looking to take their watermarking skills to the next level, Lightroom offers several advanced techniques. These can help streamline your workflow and make your watermarks more effective and less intrusive.
Creating Watermarks in Lightroom CC
- Accessing Watermark Settings: In Lightroom CC, the process is slightly different from Classic. Go to ‘Share’ and then ‘Custom Settings’.
- Configuring Watermark Details: Here, you can choose to include a watermark and then click the gear icon to edit or create a new watermark.
- Flexibility Across Devices: One of the perks of Lightroom CC is that your watermark settings can sync across all your devices, including mobile.
Watermark Automation in Editing Workflow
- Preset Watermarks: In Lightroom Classic, you can set up export presets that include your watermark settings. This makes it easier to apply watermarks consistently across different projects.
- Batch Processing: Use Lightroom’s batch processing capabilities to apply watermarks to large groups of images at once, saving time and ensuring consistency.
Tips for Unobtrusive Watermarking
- Finding the Right Spot: Place your watermark in an area that doesn’t take away from the main subject of the photo. Corners are often a good choice.
- Opacity Adjustments: Keep your watermark subtle. A lower opacity means it won’t distract from the photo but will still be visible.
- Size Matters: Ensure your watermark is big enough to be seen, but not so large that it dominates the image.
- Font and Color: Choose a font and color that blend well with most of your images. A simple, sans-serif font usually works well.
Watermarks and Copyright Law
Understanding how watermarks relate to copyright law is crucial for photographers. They not only serve as a branding tool but also play a significant role in the legal protection of your work.
Legal Protection through Watermarks
- First Line of Defense: A watermark acts as a visible sign of ownership, discouraging unauthorized use of your images.
- Proof of Ownership: In legal situations, a watermark can help prove that you are the original creator of the work.
- Deterrence of Misuse: The presence of a watermark makes it more difficult for others to claim your work as their own or use it without permission.
Understanding Copyright Laws Related to Watermarks
- Automatic Copyright Protection: In many countries, your work is automatically copyrighted as soon as it’s created. A watermark reinforces this.
- Legal Evidence: If someone removes your watermark, it can be considered an infringement of copyright. This act itself can be used as evidence in legal proceedings.
- Global Differences: Copyright laws can vary from country to country. It’s important to be aware of the laws specific to your region.
While watermarks offer a layer of protection, they are not a foolproof solution against copyright infringement. However, they do add an extra level of security and can be a helpful tool in safeguarding your creative work. Remember, a watermark combined with an understanding of copyright laws provides a stronger defense for your photography.
Common Watermark Mistakes to Avoid
While watermarks are essential for protecting and branding your images, it’s easy to make mistakes that can detract from the photo’s overall impact. Being aware of these common pitfalls can help you create more effective and aesthetically pleasing watermarks.
Overpowering the Image with Watermarks
- Finding the Balance: The key is to make your watermark noticeable without it overwhelming the image. It should not be the first thing someone sees when they look at your photo.
- Subtlety is Key: Aim for a watermark that is visible upon closer inspection, but not distracting. Think of it as a subtle signature rather than a bold statement.
Poorly Designed Watermarks and Brand Impact
- Consistency in Design: Your watermark should reflect your brand’s style. Inconsistent or poorly designed watermarks can confuse your audience and detract from your brand’s professionalism.
- Quality Matters: Avoid using low-resolution graphics or fonts that are hard to read. A clean, high-quality watermark will always look more professional.
Misplacement and Size Issues
- Size Appropriately: A watermark that is too big can ruin the aesthetics of your image. Conversely, if it’s too small, it may not serve its purpose.
- Strategic Placement: Place your watermark where it complements the image. Avoid placing it over key elements of the photo, as this can disrupt the viewer’s experience.
By avoiding these common mistakes, your watermark will not only protect your images but also enhance them. A well-thought-out watermark reflects your attention to detail and your commitment to your craft.
Conclusion
As we’ve explored, watermarks are a vital part of a photographer’s toolkit. They serve not just as a means of protecting your images, but also as a way to brand your work and assert your rights as a creator. Whether you choose a subtle text watermark or a distinctive graphic logo, the key is to integrate it seamlessly into your work, enhancing rather than detracting from your images.
Remember, the best watermarks are those that viewers notice only after appreciating your photograph. They should be a signature that respects the integrity of the image while marking it as your own. By following the guidelines and techniques outlined in this article, you can create effective watermarks that protect your work and showcase your brand, all without compromising the beauty of your photography.