Need to Remove Apple ID from Your MacBook? Here’s How!
Removing your Apple ID from a MacBook might seem like a simple task, but it’s an important one. Whether you’re planning to sell your MacBook, give it away, or just want to start fresh with a new Apple ID, understanding how to safely and effectively remove your existing ID is crucial.
Why is removing your Apple ID important? Your Apple ID is like a key to your personal digital world. It gives you access to your photos, documents, emails, and more. If you’re letting go of your MacBook, you don’t want someone else having access to this personal information.
By the end of this article, you’ll have all the knowledge and tools you need to successfully remove your Apple ID from your MacBook, ensuring your personal data is secure and your MacBook is ready for its next user or a fresh start with a new Apple ID. Let’s get started!

Preparing to Remove Your Apple ID
Before you start the process of removing your Apple ID from your MacBook, it’s important to get a few things in order. This preparation step is crucial to ensure that you don’t lose any important data and that the removal goes smoothly.
Here’s what you need to do:
- Backup Your Data: First and foremost, create a backup of all the data on your MacBook. This includes your documents, photos, music, and any other important files. You can use Time Machine, a built-in backup feature on your MacBook, to do this. It’s a simple yet effective way to make sure all your data is safe.
- Understand the Consequences: Know what happens when you remove your Apple ID. You’ll lose access to iCloud services, including your iCloud Drive, Photos, and any other data synced through iCloud. If you have any purchases made with your Apple ID, like apps or music, you won’t be able to access them after removal.
- Sign Out of All Devices: If you’re using the same Apple ID on other devices, like an iPhone or iPad, it’s a good idea to sign out from those devices as well. This ensures that your ID is completely disconnected from all your devices.
- Review Your iCloud Data: Check the data stored in your iCloud account. If there are any files or photos you want to keep, make sure to download them to your MacBook or another device before you start the removal process.
- Check Device Authorization: If you have authorized your MacBook for iTunes or other services, remember to deauthorize it. This can usually be done through the app or service settings.
Why Backup is Crucial
Understanding why a backup is crucial is an essential part of preparing to remove your Apple ID from your MacBook. The primary reason is data protection. By creating a backup, you ensure that all your important files, photos, and documents are safely stored and won’t be lost during the Apple ID removal process. This step is especially important because once your Apple ID is removed, accessing data synced with iCloud, such as your documents and photos, won’t be possible.
Another key benefit of backing up your data is easy recovery. If you find yourself needing to access your old data after the Apple ID has been removed, having a backup means you can easily retrieve it without hassle. This is particularly useful for those unexpected moments when you realize you need a file or a photo that was stored in your iCloud.
Lastly, creating a backup gives you peace of mind. Knowing that your data is safe and secure can alleviate the stress associated with the removal process. It ensures that you’re prepared for any eventuality and can proceed with removing your Apple ID without worrying about losing any important information. So, taking the time to back up your data is a step you definitely shouldn’t skip.
How to Remove Apple ID on macOS Catalina and Later
If you’re using a MacBook that runs macOS Catalina or a later version, removing your Apple ID involves a few specific steps. This process is straightforward and designed to ensure that you can safely remove your ID without affecting the functioning of your MacBook.
Here’s how you can do it:
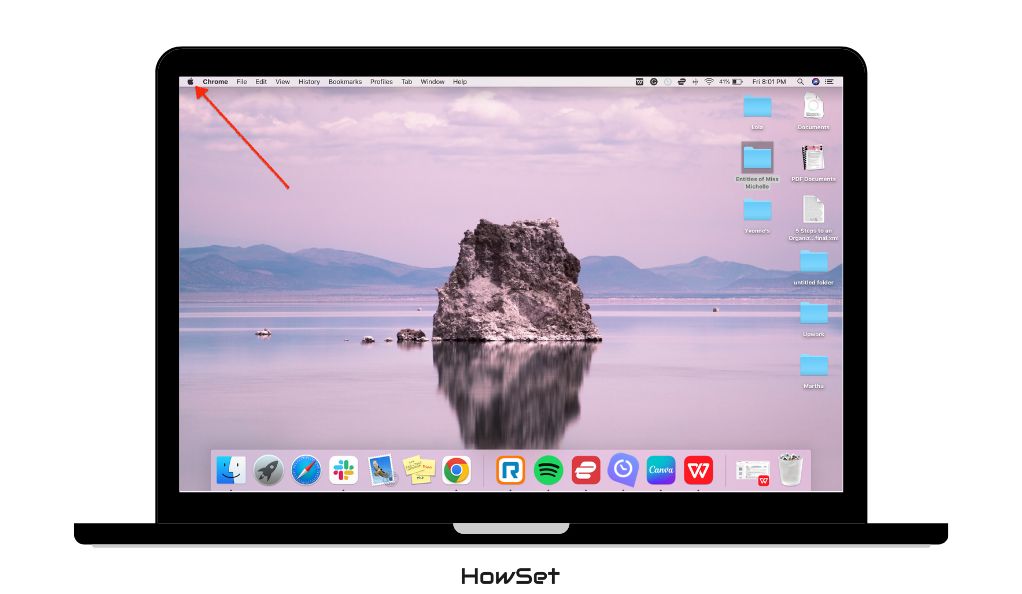
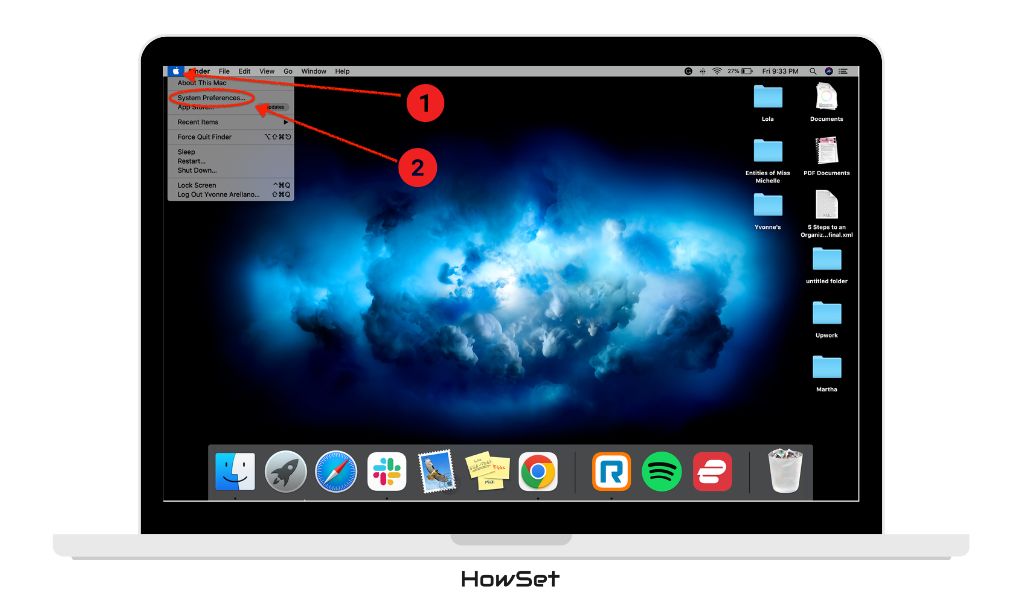
- Click on the Apple Menu: Start by clicking on the Apple icon located in the upper left corner of your screen.
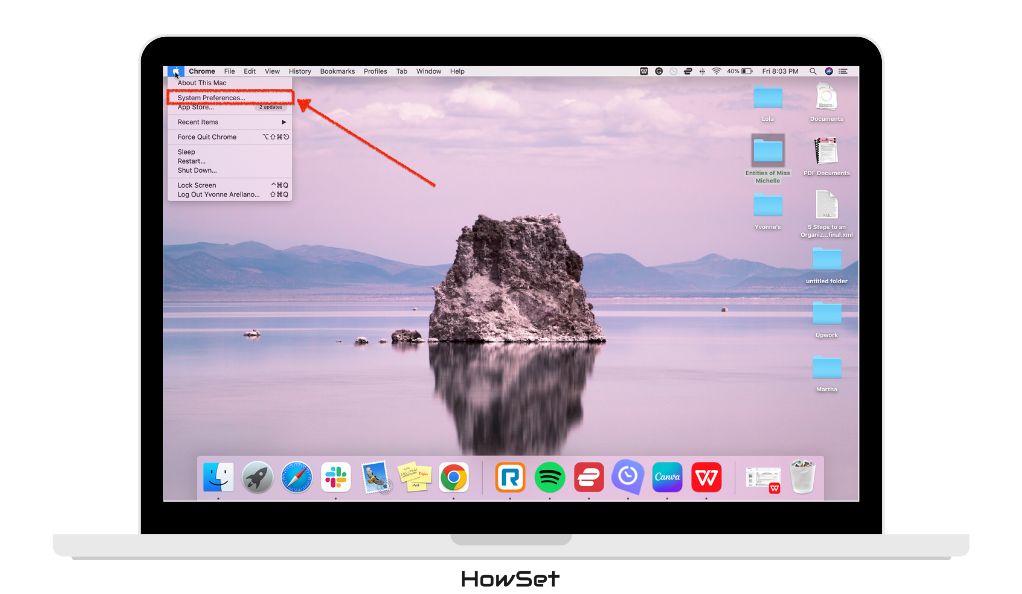
- Open System Preferences: From the drop-down menu, select ‘System Preferences’. This is where you can change various settings on your MacBook.
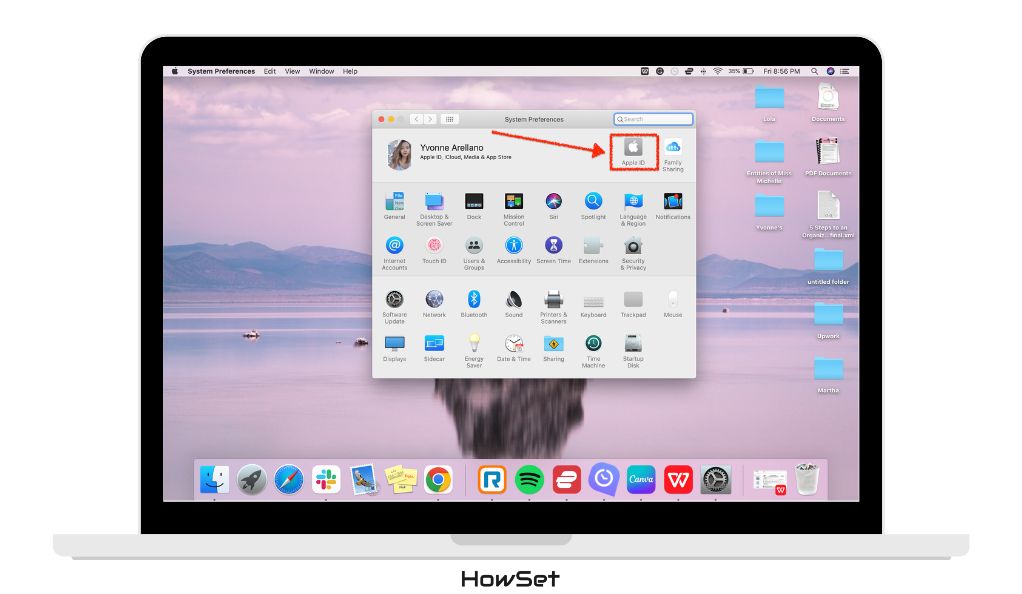
- Go to Apple ID: In the System Preferences window, find and click on ‘Apple ID’. It’s typically located at the top right.
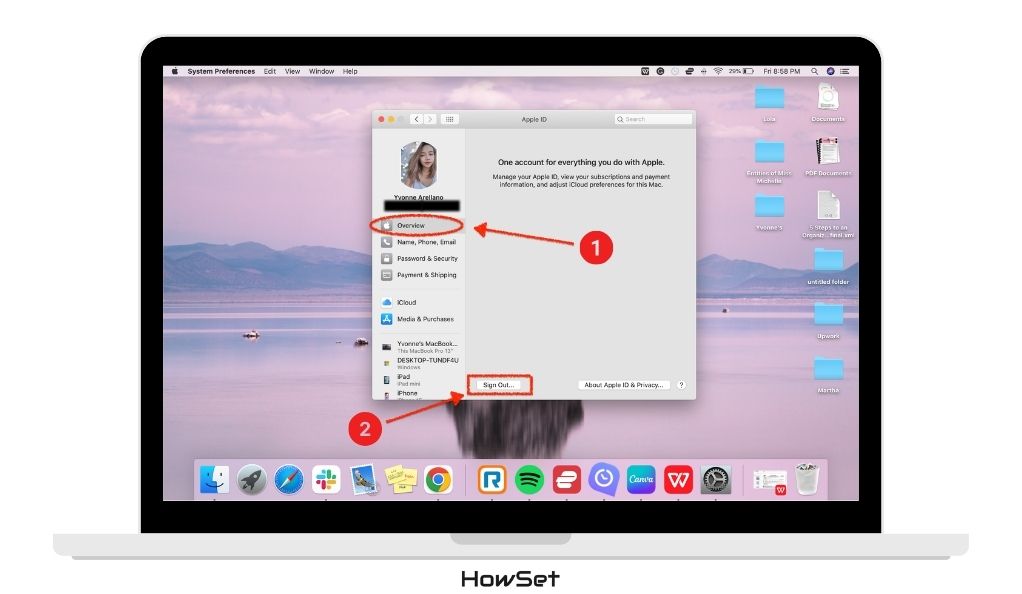
- Log Out of iCloud: Once in the Apple ID settings, navigate to the ‘Overview’ section and click on ‘Log Out’ at the bottom left corner.
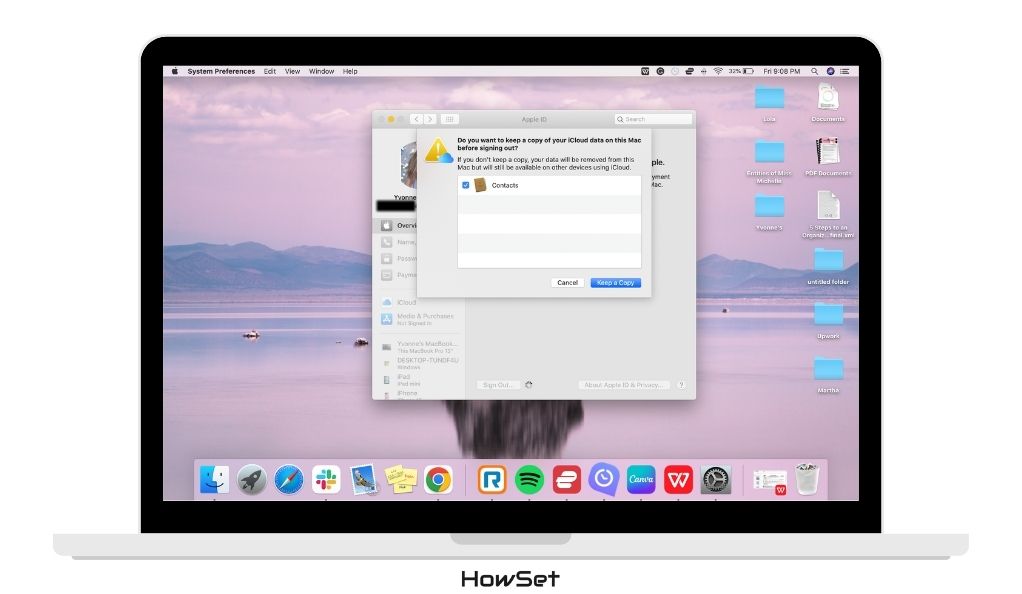
- Confirm Your Action: You will be asked to confirm that you want to log out. This step is crucial as it ensures that you are intentionally removing your Apple ID.
- Choose Data to Keep: During the logout process, you might be prompted to keep a copy of some iCloud data on your MacBook. Decide which data you want to keep, if any.
Logging Out of iCloud
Logging out of iCloud is an important part of removing your Apple ID. It’s how you ensure that all your synced data, like contacts, calendars, and reminders, are no longer linked to your MacBook. Here’s what to keep in mind:
- Data Sync: Understand that logging out of iCloud stops the sync of data like emails, contacts, and calendar events.
- Local Copies: You can choose to keep a local copy of your iCloud data on your MacBook. This data won’t sync anymore but will be available on your device.
- Final Check: Before logging out, do a final check to make sure you have backed up or saved all important information elsewhere.
By following these steps, you can successfully remove your Apple ID from a MacBook running macOS Catalina or later versions. Remember, the key is to follow each step carefully to ensure a smooth and error-free process.
Removing Apple ID on macOS Mojave and Earlier
For those who are using an older version of macOS, such as Mojave or earlier, the process to remove your Apple ID is slightly different. Although the steps are a bit different, the goal remains the same: to safely and effectively remove your Apple ID from your MacBook.
Here is a simple guide to help you through this process:
- Access System Preferences: Click on the Apple icon at the top left corner of your screen and select ‘System Preferences’.
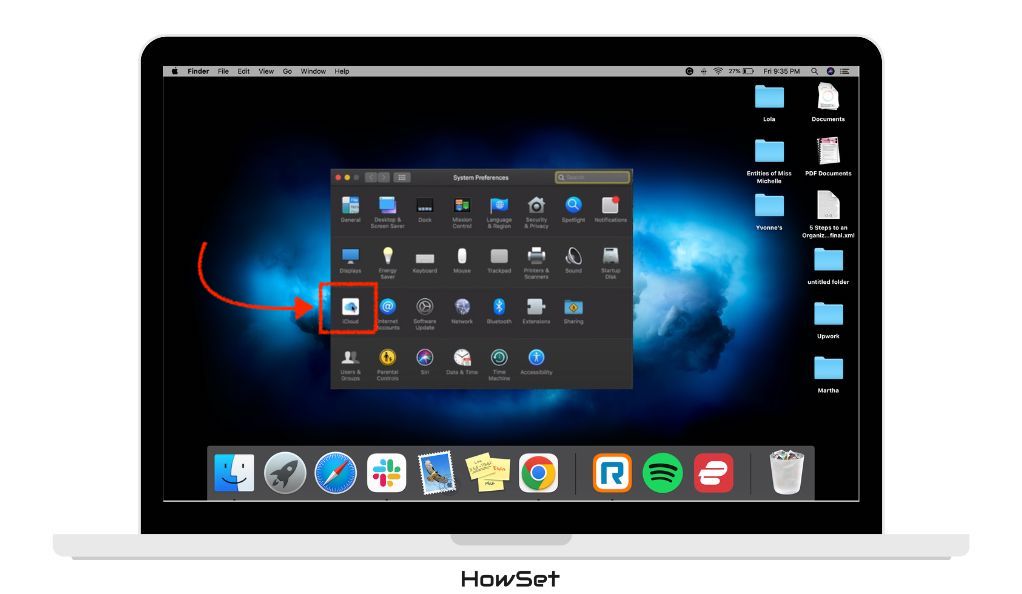
- Navigate to iCloud: In the System Preferences window, look for the ‘iCloud’ option and click on it.
- Sign Out of iCloud: Once you’re in the iCloud settings, you will find a ‘Sign Out’ or ‘Logout’ button. Click on this to start the process of removing your Apple ID.
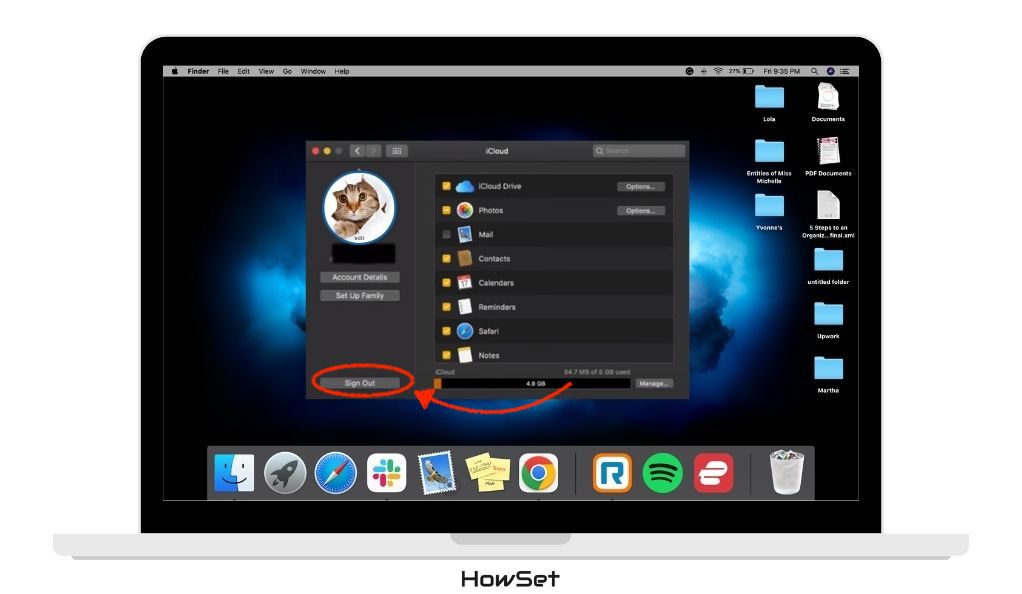
- Choose Data to Keep a Copy: You might be prompted to keep a copy of your iCloud data on your MacBook. Decide carefully which data you want to retain. This data will no longer sync with iCloud but will be accessible on your MacBook.
- Confirm Your Action: The system will ask for confirmation to ensure that you are intentionally removing your Apple ID. Go ahead and confirm.
Retaining iCloud Data Locally
When signing out of iCloud on older macOS versions, you have the option to retain certain data locally on your MacBook. This is a critical step, especially if you have important information stored in iCloud that you might need later. Here’s what to consider:
- Data Types: You can choose to keep copies of Contacts, Calendars, Reminders, and other iCloud data.
- Local Access: The data you choose to keep will be saved on your MacBook and accessible even after you remove your Apple ID.
- No More Sync: Remember, once you sign out, this data will not update or sync with iCloud anymore.
By carefully following these steps, you can remove your Apple ID from an older macOS system without losing any essential data. It’s important to proceed with caution and ensure you understand each step to avoid any accidental data loss.
Unlinking MacBook from Apple ID Remotely
After you’ve logged out of your Apple ID on your MacBook, there’s another important step to consider, especially if you’re selling or giving away your MacBook. This step is unlinking your MacBook from your Apple ID remotely. This ensures that your MacBook is completely disassociated from your Apple ID and is ready for a new user.
Here’s how you can do it:
Use Another Device: You need another device like an iPhone or an iPad that is logged in with the same Apple ID.
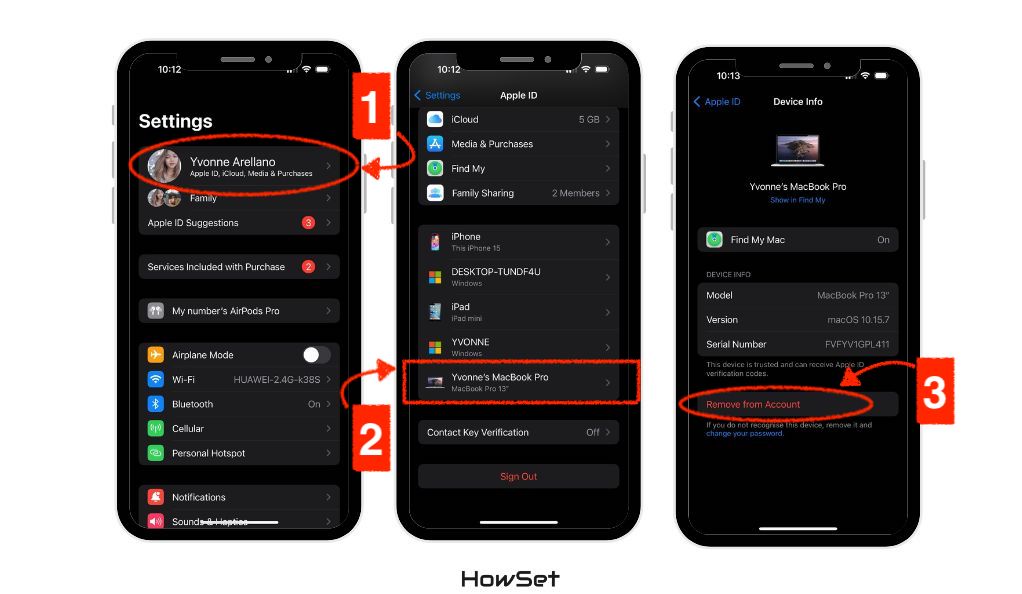
- Open Settings: On your iPhone or iPad, go to the ‘Settings’ app.
- Access Apple ID Settings: Click on your name at the top of the Settings menu to access your Apple ID settings.
- Find Your Devices: Scroll down to the ‘Devices’ section where you’ll see a list of all devices connected to your Apple ID, including your MacBook.
- Select Your MacBook: Find and select the MacBook you want to remove from your Apple ID.
- Remove the MacBook: Choose the option to ‘Remove from Account’ or ‘Remove this Device’. Confirm the action.
Why It’s Important to Remove Your MacBook Remotely
Understanding the importance of remotely removing your MacBook from your Apple ID is crucial, especially in scenarios where you are transferring the MacBook to a new user. This step is vital for several reasons. Firstly, it enhances security by ensuring that your personal information is no longer linked to the MacBook. This is particularly important if the MacBook is going to be used by someone else, as it prevents any accidental access to your private data. Secondly, it facilitates a clean transfer of ownership. By unlinking the MacBook from your Apple ID, you’re ensuring that the new user can set up their own Apple ID without any complications or residues from your account. Lastly, it helps prevent future issues for the new user, especially those related to accessing or using Apple services. Neglecting this step could lead to potential complications with services like iCloud or the App Store, which could be inconvenient for both you and the new owner. Therefore, taking the time to remove your MacBook remotely from your Apple ID is an essential step in securing your data and ensuring a smooth transition for the MacBook’s next user.
By following these steps, you can rest assured that your MacBook is completely disconnected from your Apple ID. This is a vital step for protecting your personal information and ensuring a smooth transition for the new user of the MacBook.
Conclusion
Removing your Apple ID from a MacBook is a crucial step for ensuring your personal data’s security, especially if you’re transferring the device to a new user or starting afresh. This guide aimed to simplify the process, highlighting the importance of backing up data and understanding the specific steps for different macOS versions. Whether you’re unlinking your MacBook remotely for a new owner or setting up a new Apple ID for continued use, the process is about safeguarding your privacy and adapting the device for its next chapter. By following these clear, easy-to-understand steps, you can confidently manage your Apple ID, ensuring a secure and smooth transition for your MacBook.