Is Windows Explorer Using a Lot of CPU Power? The Solution Is This:
Welcome to our guide on reducing high CPU usage by Windows Explorer. Many computer users experience their PCs slowing down, often without understanding why. A common culprit is high CPU usage, particularly by a key component like Windows Explorer. This issue can lead to frustration as it affects the smooth running of your computer, making simple tasks take longer than they should. In this article, we’ll explore practical ways to tackle this problem, ensuring your computer runs more efficiently. Whether you’re a casual user or rely heavily on your PC for work, these steps will help you maintain optimal performance and enjoy a better computing experience.
Understanding Windows Explorer High CPU Usage

Windows Explorer: The Heart of Your PC’s Interface
Windows Explorer, also known as File Explorer, is like the navigator of your PC. It lets you browse files, open programs, and manage resources. Normally, it runs smoothly. But sometimes, it starts using more CPU power than it should. This can slow down your PC and affect its performance.
Why Does High CPU Usage Happen?
- Multiple Open Programs: Having many applications open can overload Windows Explorer.
- Malware: Viruses or malware can cause extra strain on your system resources.
- Corrupted Files or Settings: Sometimes, system or file errors can lead to increased CPU usage.
- Outdated or Faulty Drivers: Drivers that aren’t up-to-date can conflict with Windows Explorer.
Identifying the Cause
To pinpoint the exact cause, you can:
- Use Task Manager to check CPU usage.
- Run a system scan for malware.
- Update drivers and Windows.
- Clean up unnecessary files.
Remember, understanding the cause is the first step to solving the problem.
How to Diagnose High CPU Usage in Windows Explorer
Identifying the Issue in Windows Explorer
Before we fix the high CPU usage, we need to confirm that Windows Explorer is the cause. It’s like a detective figuring out who’s responsible for a problem. Here’s how you do it:
Using Task Manager to Spot the Culprit
- Opening Task Manager: Press
Ctrl + Shift + Escto open Task Manager. - Checking CPU Usage: Look under the ‘Processes’ tab. Here, you’ll see a list of all running programs and how much CPU they’re using.
- Identifying Windows Explorer: Find Windows Explorer in the list. If it’s using a lot of CPU (more than it should), then we’ve found our suspect.

By following these steps, you’ll be able to see if Windows Explorer is indeed using too much CPU. This is the first step in solving the problem and making your computer run smoother.
How to Restart Windows Explorer Process
Rebooting Windows Explorer: A Quick Fix
Sometimes, simply restarting Windows Explorer can fix high CPU usage. It’s like giving your PC a quick refresh. This process is safe and won’t affect your files or programs.
Steps to Restart Windows Explorer
- Accessing Task Manager: First, open Task Manager using
Ctrl + Shift + Esc. - Locating Windows Explorer: In the ‘Processes’ tab, find Windows Explorer.
- Restarting the Process: Right-click on Windows Explorer and select ‘Restart’.

This action will refresh Windows Explorer. It’s a simple but effective way to potentially reduce high CPU usage. Remember, it’s a temporary fix. If the problem persists, further steps might be needed.
How to Run System Maintenance Troubleshooter
The Role of System Maintenance in CPU Health
Just like a car needs regular check-ups, your computer benefits from system maintenance. This can help resolve issues causing high CPU usage, including those with Windows Explorer.
Running the Troubleshooter
- Accessing Control Panel: Open the Control Panel from the Start menu.

- Navigating to Troubleshooting: Look for ‘Troubleshooting’ and click on it.
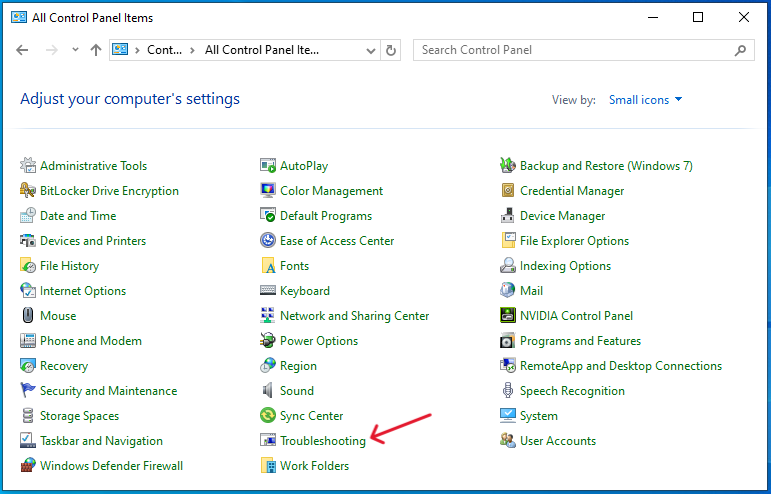
- Selecting System Maintenance: Find and select ‘Run maintenance tasks’. This starts the troubleshooter.
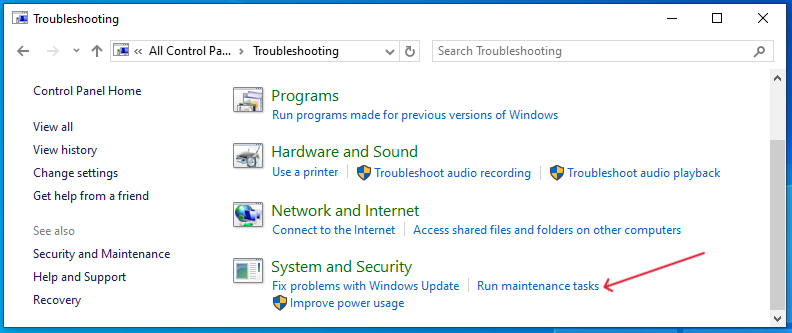
By following these steps, you allow Windows to automatically find and fix issues that might be causing high CPU usage. It’s a simple yet effective tool to keep your PC running smoothly.
How to Delete Temporary Files
Cleaning Up to Improve Performance
Temporary files can accumulate over time, taking up space and potentially causing high CPU usage. Removing these files is like clearing out unnecessary clutter in your computer’s storage.
Easy Steps to Remove Temporary Files
- Opening Settings: Press
Windows Key + Ito open Settings.

- Navigating to Storage: Go to ‘System’ and then ‘Storage’.

- Accessing Temporary Files: Click on ‘Temporary Files’. Windows will then show you a list of temporary files you can remove.

- Selecting Files to Delete: Choose the files you want to delete and click ‘Remove files’.
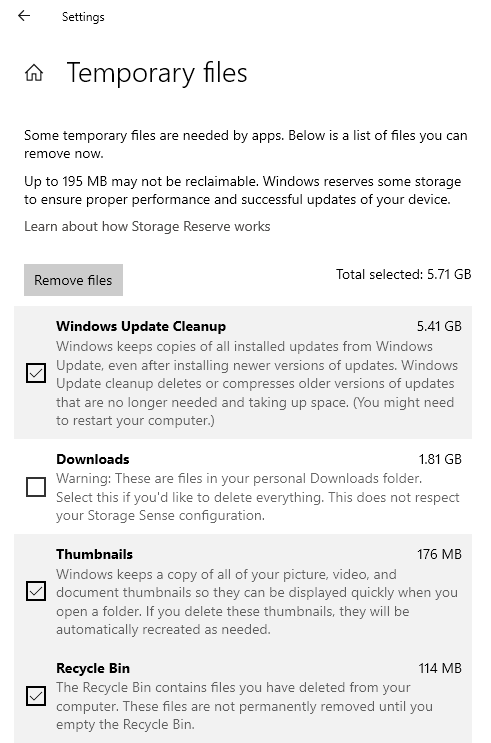
This process helps in freeing up space and could reduce the load on your CPU. It’s a straightforward and effective way to keep your computer running efficiently.
How to Manage Linked Accounts and Sync Settings
Streamlining for Better Performance
Linked accounts and sync settings, like those from OneDrive or email accounts, can impact your CPU usage. Managing these settings can help streamline your system’s performance.
Adjusting Account Settings and Sync Options
- Opening Settings: Press the
Windows Key + Ito access Settings. - Accessing Accounts: Go to the ‘Accounts’ section.
- Managing Sync Settings: Under ‘Email & accounts’, you can adjust the settings for each account, including synchronization options.
By tweaking these settings, you can reduce the background activity that may be contributing to high CPU usage. This adjustment can lead to a smoother and more efficient PC experience.
How to Restore Power Plan to Default Settings
Optimizing Energy Settings for Better CPU Usage
Your computer’s power plan can affect its performance and CPU usage. Sometimes, restoring the power plan to its default settings can help resolve high CPU usage issues.
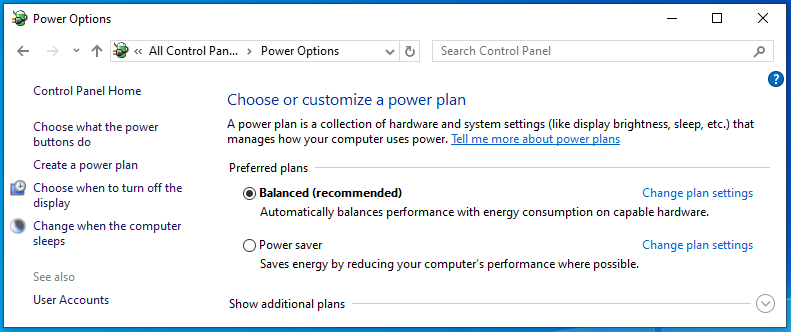
Reverting to Default Power Plan
- Opening Power Options: Press
Windows Key + R, typecontrol panel, and press Enter. Then, go to ‘Hardware and Sound’ and select ‘Power Options’.

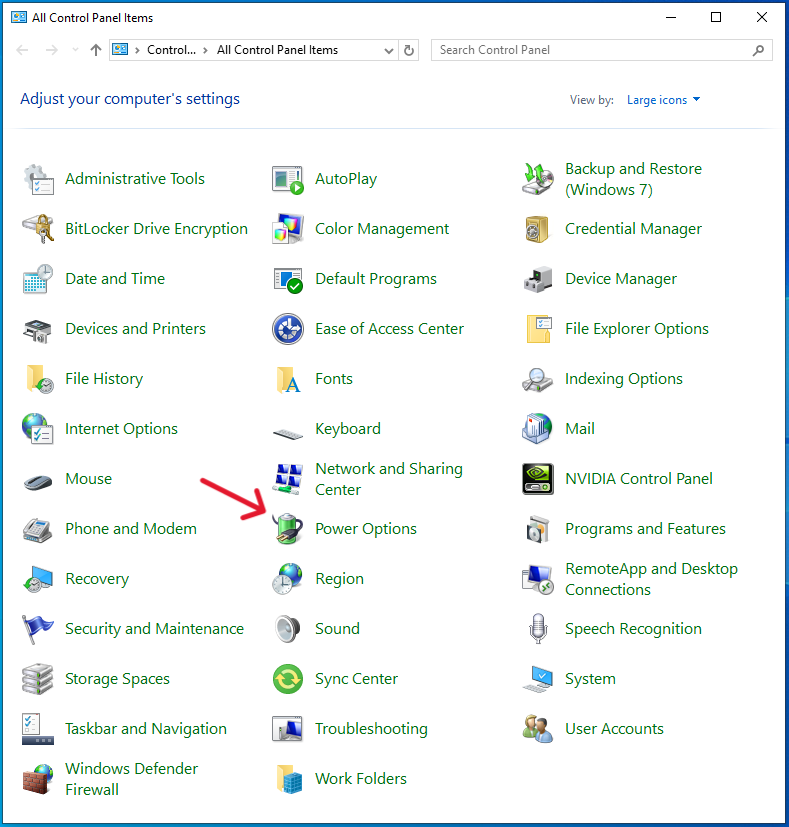
- Selecting Default Plan: Here, you can see your current power plan. Choose ‘Balanced’ or ‘Power saver’ to revert to a default setting.
This adjustment can help balance your computer’s energy consumption with its performance needs, potentially reducing high CPU usage. It’s a simple yet effective step towards optimizing your PC.
How to Rebuild Windows Search Index
Improving Efficiency with Search Indexing
The search indexing feature in Windows can sometimes use a lot of CPU resources, especially if it’s not functioning properly. Rebuilding the index can often resolve these issues.
Steps to Rebuild the Search Index
- Accessing Indexing Options: Open Control Panel, then go to ‘Indexing Options’.
- Rebuilding the Index: In the Indexing Options window, click on ‘Advanced’, then select ‘Rebuild’ under the Troubleshooting section.
This process might take some time to complete, but it can significantly improve your system’s performance by optimizing how Windows searches files and folders. It’s a worthwhile step if you’re experiencing high CPU usage related to search activities.
How to Scan for Malware
Securing Your PC Against Malware
Malware, a common cause of high CPU usage, can significantly slow down your PC. Regularly scanning for malware is a key step in maintaining your computer’s health and performance.
Conducting a Malware Scan
- Using Windows Security: Open Windows Security from the Start menu.
- Running a Scan: Select ‘Virus & threat protection’, then choose ‘Scan options’. Here, you can run a full scan of your system.
This process checks your computer for any malicious software that could be using your CPU resources. Keeping your PC free from malware not only improves performance but also ensures your data’s safety.
How to Install Pending Windows Updates
Keeping Windows Up-to-Date for Optimal Performance
Windows updates can play a crucial role in your PC’s performance and security. Ensuring that your system is up-to-date can help resolve high CPU usage issues caused by outdated software.
Installing Windows Updates
- Accessing Update Settings: Click on the Start menu, then go to ‘Settings’ > ‘Update & Security’.
- Checking for Updates: In the ‘Windows Update’ section, click on ‘Check for updates’.
- Installing Updates: If updates are available, follow the prompts to install them.

This process helps ensure that your system has the latest features and security enhancements, which can improve its efficiency and reduce CPU usage. Regular updates are key to maintaining a healthy and fast-running PC.
Conclusion
In this guide, we’ve explored various effective strategies to reduce high CPU usage by Windows Explorer. By regularly checking for updates, managing settings, and performing system maintenance, you can significantly enhance your PC’s performance. Consistent attention to these areas will not only resolve current issues but also prevent future ones, ensuring a smoother and more efficient computing experience. Remember, the key to a healthy PC lies in regular care and maintenance.