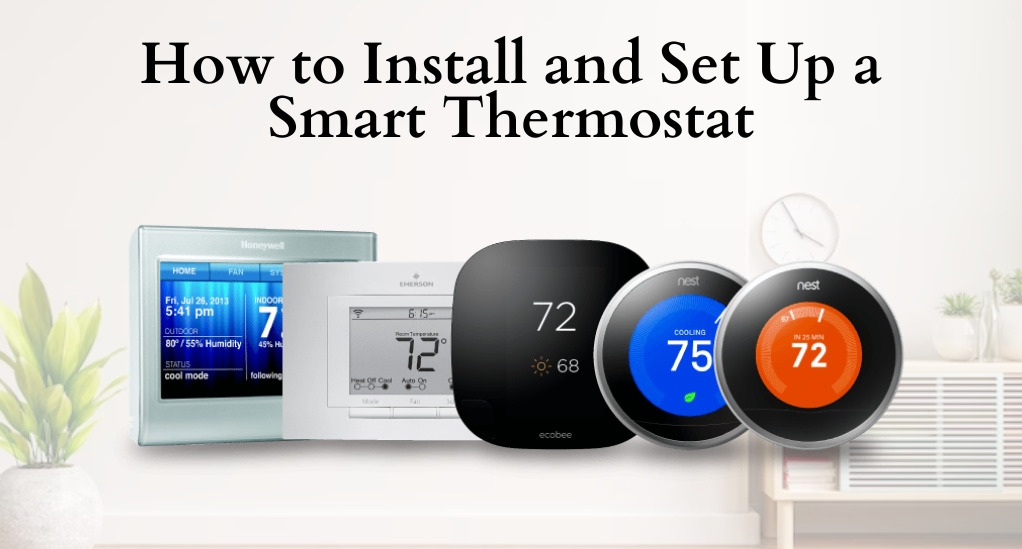
How to Install and Set Up a Smart Thermostat
In today’s digital age, the quest for a smarter, more energy-efficient home has led to the rise of various smart devices. Among these, the smart thermostat stands out as a game-changer. Not only does it offer homeowners the convenience of adjusting their home’s temperature from anywhere, but it also promises significant energy savings. This article delves into the intricacies of installing and setting up a smart thermostat, ensuring you reap its full benefits.
Why Consider a Smart Thermostat?
Energy Efficiency: Traditional thermostats allow you to adjust the temperature, but they don’t learn from your habits or adjust to external factors. Smart thermostats, on the other hand, can learn your routines, detect when you’re home or away, and even check the weather forecast to make intelligent adjustments. This proactive approach can lead to substantial energy savings. According to some studies, households can save up to 15% on heating and 10% on cooling annually by using a smart thermostat.
Remote Control: Ever left home wondering if you turned off the heating? With a smart thermostat, such worries are a thing of the past. Using a dedicated app on your smartphone or tablet, you can adjust your home’s temperature from anywhere, ensuring comfort when you arrive and savings when you’re away.
Integration with Other Smart Devices: Many smart thermostats can seamlessly integrate with other smart home devices, such as smart speakers, lights, and security systems. This interconnected ecosystem enhances the overall smart home experience.
Cost Savings: While the initial investment might be higher than traditional thermostats, the long-term savings on energy bills can quickly offset the upfront cost. Plus, many utility companies offer rebates for installing energy-efficient devices, further reducing the overall expense.
| Comparison | Traditional Thermostat | Smart Thermostat |
|---|---|---|
| Adjustment | Manual | Automatic based on habits |
| Remote Control | No | Yes |
| Energy Savings | Limited | Up to 25% annually |
| Integration | None | With other smart devices |
| Cost | Lower upfront cost | Higher upfront, but long-term savings |
Choosing the Right Smart Thermostat
The market is flooded with a plethora of smart thermostats, each boasting unique features and capabilities. To make an informed decision, it’s crucial to understand the key factors that should influence your choice.
1. Compatibility with Your HVAC System
Before diving into the world of smart thermostats, ensure that the one you’re eyeing is compatible with your home’s heating, ventilation, and air conditioning (HVAC) system. While most modern smart thermostats support common systems, it’s always a good idea to double-check, especially if you have a multi-stage heating or cooling system.
2. Features and Functionality
Different smart thermostats come with varying features. Here are some to consider:
- Learning Abilities: Some thermostats, like the Nest Learning Thermostat, can learn your habits over time and adjust settings accordingly.
- Geofencing: This feature uses your smartphone’s location to determine when you’re home or away, adjusting the temperature for energy savings or comfort.
- Integration with Other Devices: If you have other smart devices at home, consider a thermostat that can integrate seamlessly with them. For instance, some thermostats can be controlled using voice commands through smart speakers like Amazon Echo or Google Home.
- Energy Usage Reports: Some smart thermostats provide detailed energy usage reports, helping you understand your consumption patterns and make informed decisions.
3. User Interface and Ease of Use
A user-friendly interface can make the transition to a smart thermostat smoother. Look for thermostats with intuitive touchscreens, clear displays, and easy-to-navigate apps.
4. Budget
While smart thermostats can lead to long-term savings, they come at varying price points. Determine your budget and weigh it against the features you deem essential. Remember, the most expensive option isn’t always the best for your specific needs.
5. Reviews and Recommendations
Before making a purchase, it’s wise to read user reviews and seek recommendations. This can provide insights into the thermostat’s performance, reliability, and potential issues.
6. Aesthetics
While functionality is paramount, aesthetics shouldn’t be overlooked. After all, the thermostat will be a visible fixture in your home. Choose a design and color that complements your interior decor.
Making the Right Choice
Armed with this knowledge, you’re better positioned to sift through the myriad of options available. Whether you prioritize energy savings, integration capabilities, or aesthetics, there’s a smart thermostat tailored to your needs.
Preparation Steps Before Installation
Once you’ve selected the perfect smart thermostat for your home, it’s time to prepare for its installation. Proper preparation ensures a hassle-free process and optimal performance of your new device. Here’s a step-by-step guide to get you started:
1. Gather Necessary Tools and Materials
Before you begin, ensure you have all the tools and materials required for the installation. Commonly needed items include:
- Screwdrivers (both flat-head and Phillips)
- Wire stripper (if not pre-stripped)
- Level (to ensure the thermostat is mounted straight)
- Smartphone or tablet (for setup and app installation)
- Batteries (if not included with the thermostat)
2. Safety First: Turn Off the Power
Safety should always be your top priority. Before touching any wires or starting the installation process, turn off the power to your HVAC system. This can usually be done at the circuit breaker or the service switch on the furnace.
3. Document the Current Setup
Before removing your old thermostat, take a clear photograph of the wire connections. This will serve as a reference when connecting the wires to your new smart thermostat. Different wire colors typically correspond to different functions, and having a photo can simplify the setup process.
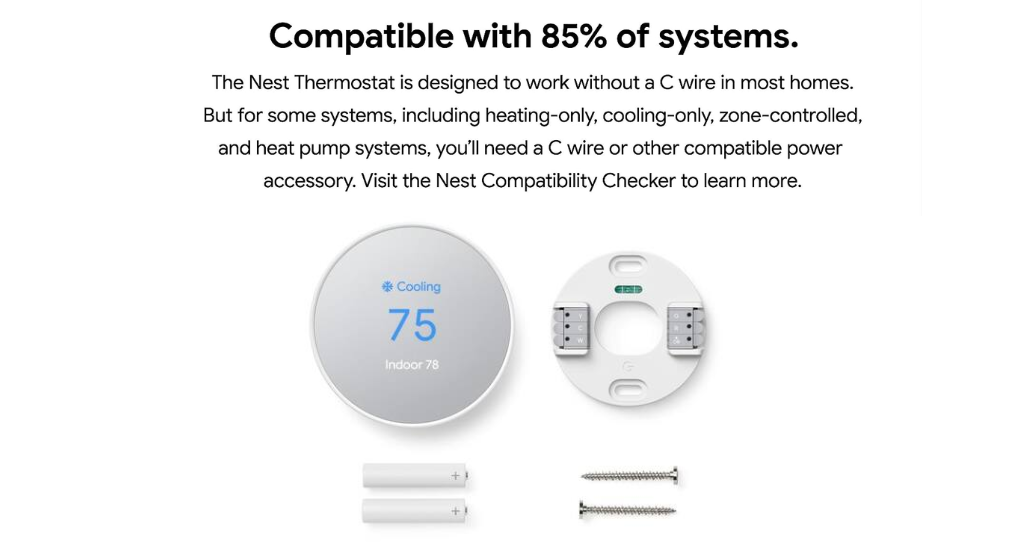
4. Check for a ‘C’ Wire
Many smart thermostats require a ‘C’ wire (common wire) to provide continuous power. Examine the wires connected to your current thermostat to see if a ‘C’ wire is present. If not, you might need an adapter or additional installation steps. Some smart thermostat packages include solutions for homes without a ‘C’ wire.
5. Read the Manufacturer’s Instructions
While this guide provides a general overview, it’s essential to read the manufacturer’s instructions that come with your specific smart thermostat. These instructions will offer detailed steps tailored to your device and may highlight any unique requirements or features.
Setting the Stage for a Smooth Installation
With these preparatory steps completed, you’re now ready to embark on the actual installation process. Proper preparation not only ensures safety but also sets the stage for a smooth and efficient installation. By following these guidelines, you’ll be one step closer to enjoying the benefits of your new smart thermostat.
Removing the Old Thermostat
Transitioning to a smart thermostat begins with the removal of your old device. This process is generally straightforward, but it’s essential to proceed with caution to avoid any mishaps. Here’s a step-by-step guide to safely and efficiently remove your old thermostat:
1. Reconfirm the Power is Off
Before you start, double-check that the power to your HVAC system is turned off. This ensures your safety and prevents any accidental damage to your system.
2. Detach the Faceplate
Most traditional thermostats have a detachable faceplate. Gently pull or unclip the faceplate from its base. Some models might have screws securing the faceplate, so keep your screwdriver handy.
3. Label the Wires
Using the photograph you took during the preparation phase, label each wire with its corresponding terminal code. This step is crucial, as it will make the installation of your smart thermostat much smoother. Many smart thermostat kits come with adhesive labels for this purpose.
4. Disconnect the Wires
Using your screwdriver, loosen the screws on the terminals and gently remove each wire. Ensure the wires don’t fall back into the wall cavity. You can use a small piece of tape to secure them in place temporarily.
5. Remove the Base Plate
After disconnecting all the wires, unscrew and remove the base plate of the old thermostat from the wall.
6. Patch and Paint (If Necessary)
Depending on the size and design of your new smart thermostat, you might need to patch holes or paint the area to ensure a clean and aesthetically pleasing installation. If you decide to do this, ensure the paint is dry before installing the new thermostat.
Installing the New Smart Thermostat
With the old thermostat out of the way, it’s time to usher in the new era of smart temperature control.
- Step 1. Mount the New Base Plate
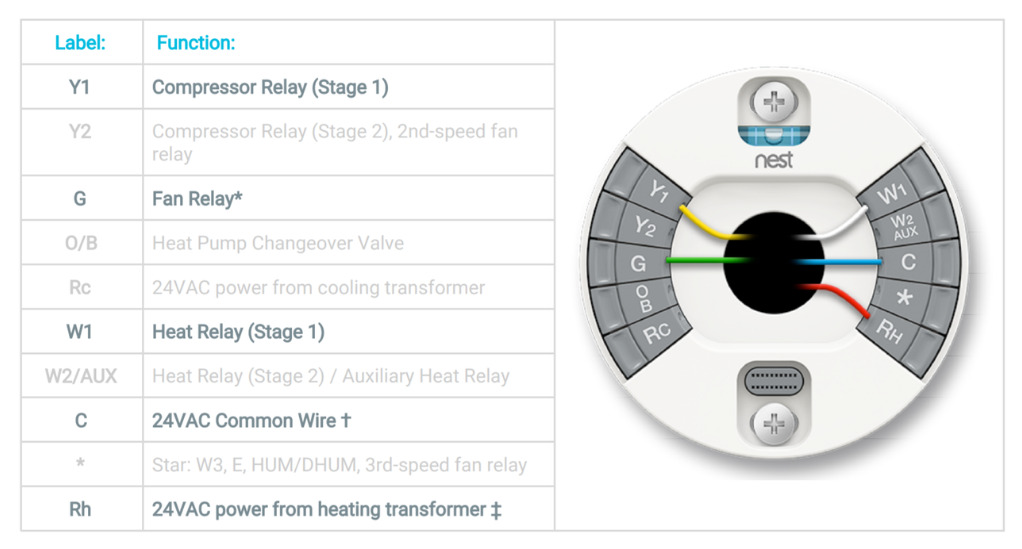
Position the new base plate on the wall, ensuring it’s level. Use the included screws to secure it in place. Some smart thermostats come with built-in levels to assist with this step. - Step 2. Connect the Wires
Referring to the photograph and labels you created earlier, connect each wire to its corresponding terminal on the new base plate. Ensure each connection is secure. - Step 3. Attach the Smart Thermostat
Once all wires are connected, snap or clip the smart thermostat onto its base plate. Some models might require screws for this step. - Step 4. Turn the Power Back On
Restore power to your HVAC system by turning on the circuit breaker or service switch. - Step 5. Initial Setup
Most smart thermostats will guide you through an initial setup process. This typically involves selecting your preferred language, connecting to Wi-Fi, and configuring basic settings.
Setting Up and Personalizing Your Smart Thermostat
With the physical installation complete, the next phase involves personalizing your smart thermostat to cater to your preferences and lifestyle. This setup ensures you maximize the benefits of your device, from energy savings to enhanced comfort.
1. Navigating the Interface
Start by familiarizing yourself with the thermostat’s interface. Most smart thermostats feature intuitive touchscreens with clear icons and prompts. Spend some time exploring the menu options, settings, and features available.
2. Connect to Wi-Fi
To harness the full potential of your smart thermostat, connect it to your home’s Wi-Fi network. This allows for remote access, software updates, and integration with other smart devices. Follow the on-screen prompts to select your network and input the password.
3. Set Your Schedule
One of the significant advantages of smart thermostats is their ability to adapt to your routine. Input your typical weekly schedule, noting times when you’re usually home, away, or asleep. Over time, many smart thermostats will learn and adjust based on your actual habits, but providing an initial schedule can optimize energy savings from the start.
4. Adjust Temperature Preferences
Determine your preferred temperatures for various scenarios:
- Home: The temperature you desire when you’re at home and awake.
- Away: A more energy-efficient temperature for when you’re not home.
- Sleep: Your preferred temperature for sleeping.
Remember, even slight adjustments can lead to significant energy savings over time.
5. Enable Energy-Saving Features
Many smart thermostats come with features designed to optimize energy usage. This might include:
- Geofencing: Automatically adjusts the temperature based on your smartphone’s location.
- Learning Mode: Adapts to your habits over time.
- Airwave: Reduces air conditioning usage when humidity is low.
- Sunblock: Adjusts settings based on direct sunlight hitting the thermostat.
Explore these features and enable those that align with your preferences and lifestyle.
6. Integrate with Other Smart Devices
If you have other smart devices in your home, such as lights, locks, or speakers, see if your thermostat can integrate with them. This interconnectedness can enhance your overall smart home experience, allowing for scenarios like dimming the lights when the thermostat is set to “Sleep” mode.
7. Download the Companion App
Most smart thermostats have companion apps available for smartphones and tablets. Download the app to control your thermostat remotely, receive energy usage reports, and access advanced settings.
8. Stay Updated
Ensure your smart thermostat’s software is regularly updated. These updates can introduce new features, improve energy efficiency algorithms, and fix any bugs.
Embracing the Future of Home Comfort
With your smart thermostat now personalized to your preferences, you’re set to enjoy a new level of home comfort. Not only will your living spaces be more attuned to your needs, but you’ll also likely notice a reduction in energy bills.
Maintaining Your Smart Thermostat
A smart thermostat, like any other device, requires regular maintenance to ensure its longevity and optimal performance. While these devices are designed for durability and minimal upkeep, following some basic maintenance practices can enhance their efficiency and lifespan.
1. Regular Cleaning
- Dust and Debris: Over time, dust can accumulate on your thermostat, potentially clogging sensors and vents. Use a soft cloth or a gentle brush to clean the surface and vents of your thermostat every few months.
- Screen Cleaning: Use a microfiber cloth to clean the touchscreen, ensuring it remains responsive and clear. Avoid using harsh chemicals or abrasive materials.
2. Software Updates
Manufacturers frequently release software updates to enhance functionality, fix bugs, or introduce new features.
- Automatic Updates: Many smart thermostats are set to update automatically. Ensure this feature is enabled.
- Manual Checks: Periodically check for updates through the device interface or the companion app to ensure your thermostat is running the latest software.
3. Check Battery Levels (if applicable)
While many smart thermostats are hardwired and draw power from your home’s electrical system, some models rely on batteries, either as a primary power source or as a backup.
- Regularly Monitor: Check battery levels through the device interface or app.
- Use Quality Batteries: When replacing batteries, opt for high-quality ones to ensure longevity and optimal performance.
4. Review and Adjust Settings Seasonally
As seasons change, so do your heating and cooling needs. Review your thermostat’s settings and schedules at the onset of each season to ensure they align with your current preferences.
5. Ensure Proper Ventilation
The area around your thermostat should be free from obstructions. Avoid placing furniture or other items too close to the thermostat, as this can affect its ability to accurately read ambient temperatures.
6. Regular HVAC Maintenance
While not directly related to the thermostat, ensuring your HVAC system is in top condition can enhance the overall performance of your smart thermostat. Schedule regular check-ups for your heating and cooling systems.
7. Backup Your Settings
Some thermostats allow you to backup your settings, schedules, and preferences. This can be useful if you ever need to reset the device or replace it.
Ensuring Years of Optimal Performance
By following these maintenance guidelines, you can ensure your smart thermostat continues to operate efficiently, providing comfort and energy savings for years to come. Remember, a little proactive care can go a long way in preserving the health and functionality of your device.
Conclusion
Smart thermostats represent more than just technological advancement; they symbolize a transformative shift in home comfort and energy management. Their ability to optimize energy consumption, integrate seamlessly with other smart devices, and provide detailed insights empowers homeowners to make informed decisions, leading to tangible savings and a reduced environmental footprint. As we look to the future, the adoption of such devices isn’t merely about embracing new gadgets but about fostering a sustainable and efficient approach to our living spaces, paving the way for a harmonious blend of comfort and conservation.