Facing Network Troubles? Here’s Your Step-by-Step Solution Guide:
In today’s world, where the internet is as essential as electricity, facing network issues can be more than just a minor inconvenience. It’s like being cut off from the digital world, which can disrupt your work, entertainment, and communication. But fear not, because troubleshooting network problems doesn’t have to be a daunting task. In this guide, we aim to break down the process into simple, manageable steps that anyone can follow.
First things first, understanding the basics of your network is key. Whether you’re dealing with slow internet, no connection, or intermittent issues, knowing where to start can make a huge difference. This guide will walk you through the essential steps, from the simplest solutions like power cycling your devices to more advanced techniques such as checking IP configurations and DNS settings.

Our goal is to arm you with the knowledge and confidence to diagnose and fix common network issues. Whether you’re a tech novice or someone with a bit of know-how, this guide will help you get your network back up and running. So let’s dive in and start troubleshooting!
How to Diagnose Your Network Problem
Diagnosing network issues can often feel like finding a needle in a haystack. However, with a structured approach, you can identify the root cause more effectively. This process involves checking various aspects of your network to pinpoint where the problem lies.
Understanding the Basics
Start with the fundamentals. Check if your device is connected to the network. Look for the Wi-Fi icon on a laptop or the network bars on a smartphone. If you see no signs of connection, the issue might be with the device’s wireless adapter or the network itself.
- Check the Wi-Fi Signal: Is the signal weak or strong? A weak signal could mean you’re too far from the router.
- Examine the Router and Modem: Are the lights on? Each light typically indicates a different network activity. No lights could signal a power issue.
Checking Physical and Wi-Fi Connections
Physical connections are as crucial as wireless ones. For a wired network, ensure that the Ethernet cable is securely plugged in at both ends. For wireless networks, distance from the router can be a key factor.
- Ethernet Connections: Make sure cables are not frayed or damaged. A faulty cable could disrupt the connection.
- Wi-Fi Network Range: The farther you are from the router, the weaker the signal. Try moving closer to see if the connection improves.
Diagnosing Common Network Issues
Common network problems usually fall into a few categories. Identifying which one you’re facing can guide you to the right solution.
- Slow Internet Speed: This could be due to high network traffic or a problem with your ISP.
- Intermittent Connection: This issue often points to interference or signal strength problems.
- No Internet Access: This could mean there’s an issue with your ISP, router, or the device’s network settings.
How to Power Cycle and Check Network Devices
When facing network issues, one of the simplest yet most effective solutions is to power cycle your devices. This means turning off and then turning back on your modem, router, and computer. Power cycling can resolve a range of network problems by resetting your hardware and clearing out any temporary glitches.
Restarting Your Devices: The First Step
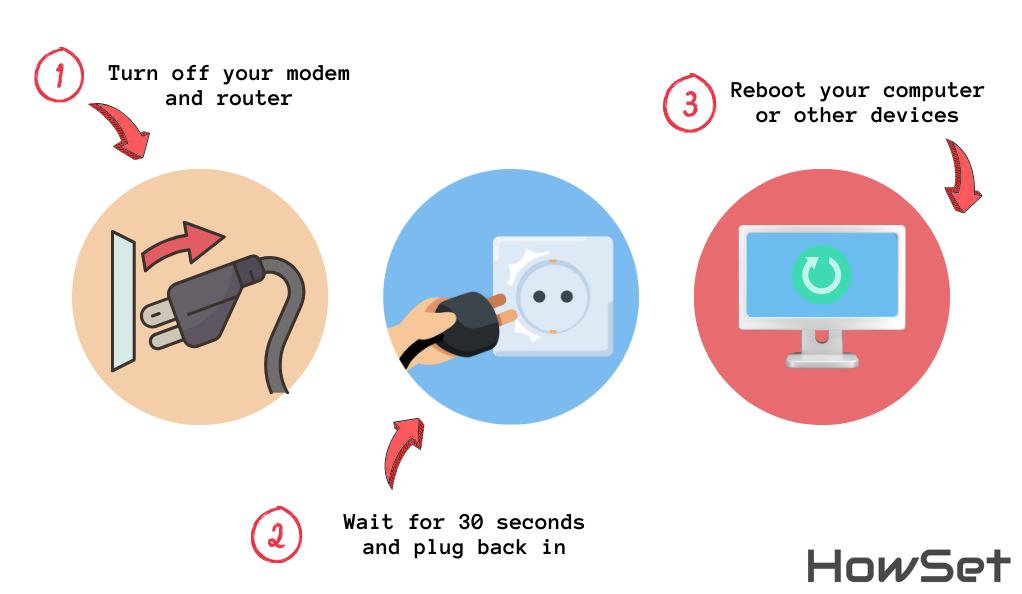
Power cycling is like giving your network a fresh start. Here’s how to do it properly:
- Turn off your modem and router: Unplug them from the power source.
- Wait for 30 seconds: This pause ensures that the devices are completely shut down and any residual power is cleared.
- Turn them back on: Plug the modem in first, wait for it to fully boot up, then turn on the router.
- Reboot your computer or other devices: This helps them reconnect to the network with a fresh start.
Checking Other Devices for Network Access
After power cycling, it’s wise to check if other devices can connect to the network. This helps in identifying whether the issue is with a specific device or the entire network.
- Check with a Smartphone or Tablet: Try connecting to the Wi-Fi with a different device. If it works, the issue might be isolated to your initial device.
- Use a Different Computer: If possible, test the network with another computer. This can further help in pinpointing the problem.
How to Check Physical Network Connections
Physical connections are the backbone of your network. Ensuring these connections are secure and intact is a crucial step in troubleshooting network issues. This includes checking Ethernet cables, router ports, and Wi-Fi signal strength. Sometimes, the solution to a network problem is as simple as fixing a loose cable or adjusting the position of your router.
Inspecting Ethernet Cables and Wi-Fi Signals
Let’s start by examining the physical components:
- Check Ethernet Cables:
- Ensure cables are securely plugged into your computer and router.
- Look for visible damage on the cables. A damaged cable can cause connectivity issues.
- Try using a different Ethernet cable to see if the problem persists.
- Assess Wi-Fi Signal Strength:
- If you’re using Wi-Fi, check the signal strength on your device.
- Move closer to the router to see if the signal improves.
- Remove any large metal objects or electronic devices that might interfere with the signal.
Identifying Interference Sources
Interference can significantly impact your Wi-Fi signal quality. Here’s how to identify and minimize interference:
- Check for Common Interference Sources: Devices like microwaves, cordless phones, and Bluetooth speakers can interfere with Wi-Fi signals.
- Change Wi-Fi Channels: Sometimes, changing the channel on your router can reduce interference. This is especially useful in areas with many overlapping Wi-Fi networks.
- Router Positioning: Place your router in a central location, away from walls and obstructions for optimal signal distribution.
By ensuring your physical network connections are in good shape and minimizing interference, you can often resolve many common network issues. Remember, a strong and stable network begins with a solid physical setup.
How to Run Network Troubleshooters in Windows
Windows operating systems come with built-in troubleshooters that are specifically designed to handle various network issues. These troubleshooters can automatically detect and sometimes even fix problems related to network connectivity. Utilizing these tools can save you time and effort in diagnosing and resolving network issues.
Using Windows Built-in Troubleshooting Tools
To access and run the network troubleshooter in Windows, follow these steps:
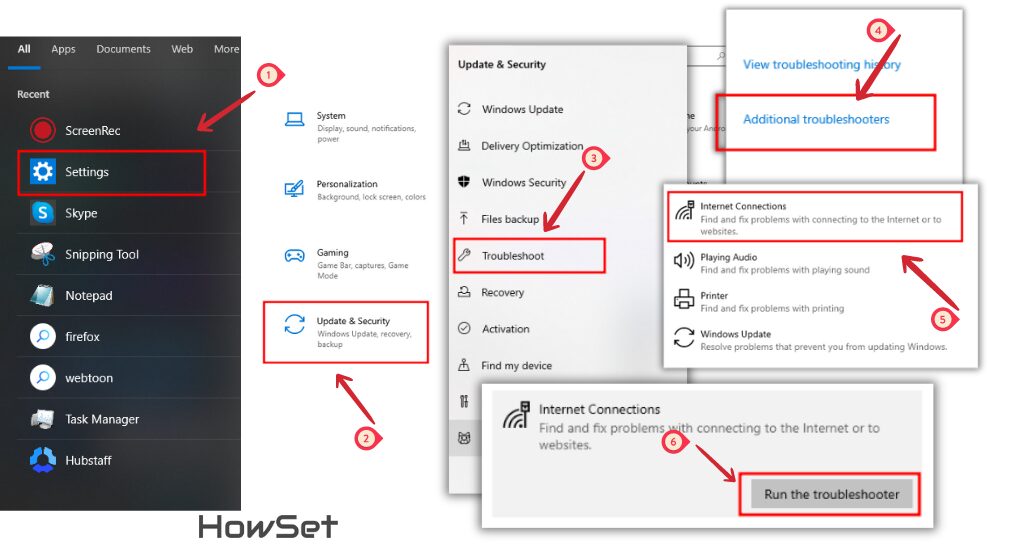
- Access the Troubleshooter:
- Go to ‘Settings’ from the Start menu.
- Click on ‘Update & Security’ and then select ‘Troubleshoot’.
- Running the Network Troubleshooter:
- Find ‘Internet Connections’ and click on it.
- Choose ‘Run the troubleshooter’. The tool will start diagnosing issues.
- Follow the Prompts:
- The troubleshooter will ask some questions or suggest some actions. Follow the prompts.
- It might reset the network adapter or renew the IP configuration.
Interpreting Troubleshooter Results
After the troubleshooting process is complete, the tool will present the findings. There are generally three types of results:
- Issue Identified and Fixed: The tool has found and resolved the issue. Check your network connection to confirm.
- Issue Identified but Not Fixed: The troubleshooter found the problem but couldn’t fix it automatically. You’ll get a report with the detected issue, which you can use for further manual troubleshooting.
- No Issue Found: If the troubleshooter didn’t find anything, the problem might be more complex or external (like a service outage from your ISP).
Using Windows Network Troubleshooters is a great first step in diagnosing network issues. It’s quick, easy, and often effective, especially for common problems. If the troubleshooter doesn’t resolve the issue, it at least provides a good starting point for further investigations.
How to Verify IP Address Validity
Verifying the validity of your IP address is an essential step in troubleshooting network issues. An IP address is like your home address on the internet, and if it’s not set up correctly, you won’t be able to connect to the network properly. Ensuring that your computer has a valid IP address is crucial for establishing a successful internet connection.
Understanding IP Address Configuration
To check your IP address in Windows, follow these steps:
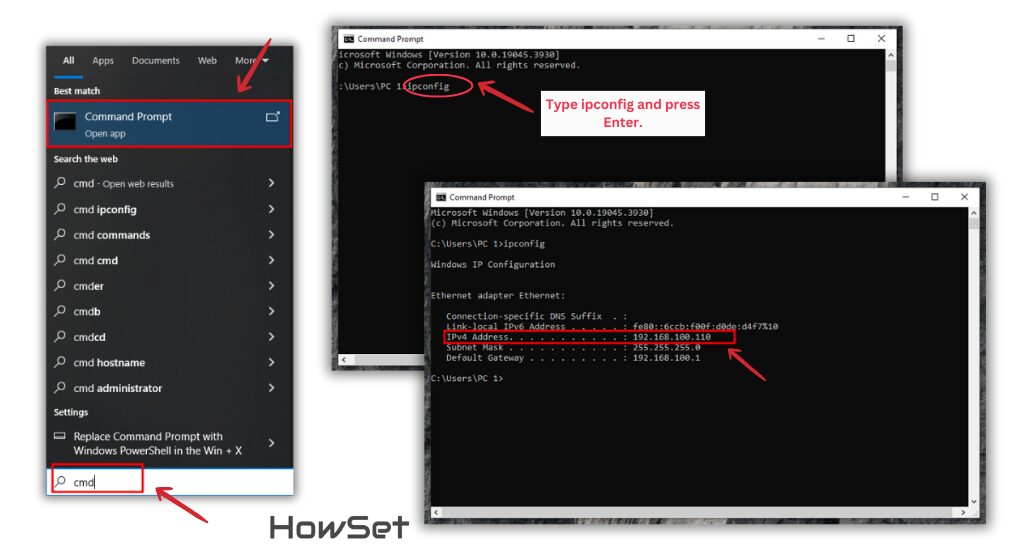
- Open Command Prompt:
- Press the Windows key, type
cmd, and hit Enter. - This opens the Command Prompt window.
- Press the Windows key, type
- Use the
ipconfigCommand:- In Command Prompt, type
ipconfigand press Enter. - Look for the “IPv4 Address” in the results. This is your IP address.
- In Command Prompt, type
- Check for Validity:
- A valid IP address typically starts with numbers other than 169.254. If it starts with 169.254, it indicates a problem.
- The IP address should be in a similar range as other devices on your network.
Manual vs Automatic IP Settings
Your computer can obtain an IP address in two ways: manually (static IP) or automatically (using DHCP). Most home networks use DHCP.
- Automatic (DHCP):
- Your router assigns an IP address automatically.
- To set your computer to obtain an IP address automatically, go to Network settings, select your network, and choose “Obtain an IP address automatically”.
- Manual (Static IP):
- You set a fixed IP address for your device.
- Use this only if you have specific network requirements.
If you find that your IP address is incorrect or in the wrong format, resetting it can often resolve your network issues. This can be done by setting your device to obtain an IP address automatically or, if necessary, assigning a correct static IP address.
How to Diagnose Hardware Issues
Diagnosing hardware issues is a critical step in resolving network problems. Hardware issues can range from a faulty router to a malfunctioning network adapter in your computer. Identifying and fixing hardware problems can restore your network connection to its optimal state.
Identifying and Resolving Hardware Malfunctions
To diagnose hardware issues, follow these steps:
- Check Your Router and Modem:
- Ensure they are turned on and the indicator lights are behaving as expected.
- Look for any signs of damage or overheating.
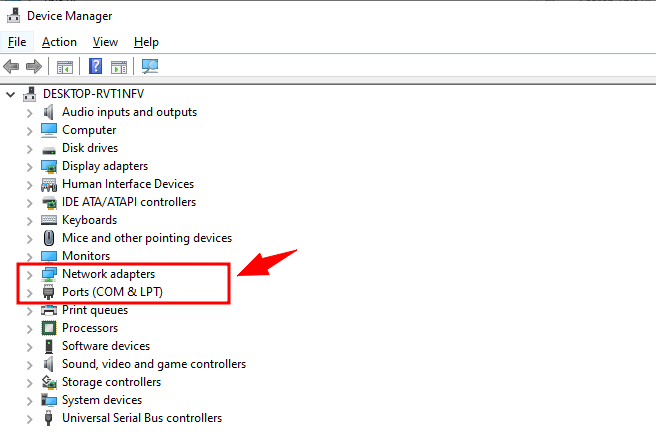
- Inspect Your Network Adapter:
- On your computer, check if the network adapter is recognized and functioning properly.
- Access this through ‘Device Manager’ in Windows.
- Try Different Ports and Cables:
- If using a wired connection, try different Ethernet ports on your router.
- Swap out Ethernet cables to rule out cable damage.
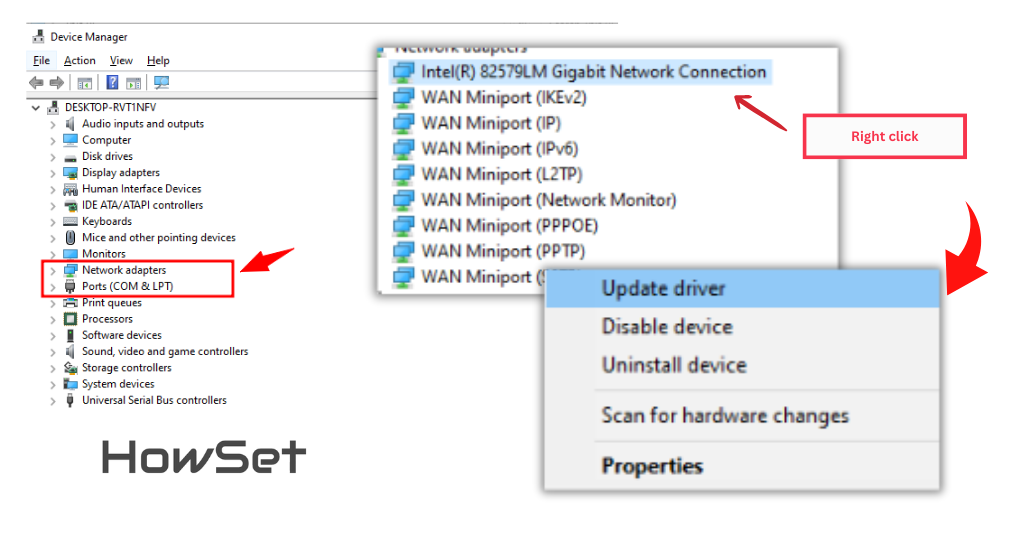
Updating Network Drivers
Outdated or corrupted drivers can cause network hardware to malfunction. Updating your network drivers can resolve these issues.
- Check for Driver Updates:
- In ‘Device Manager’, find your network adapter.
- Right-click on it and select ‘Update driver’.
- Allow Windows to search for and install any available updates.
- Download Drivers from Manufacturer’s Website:
- If Windows can’t find updates, visit the manufacturer’s website.
- Look for the support or download section to find the latest drivers for your model.
How to Resolve DNS Server Problems
DNS (Domain Name System) server issues can disrupt your ability to browse the internet even when your network connection is otherwise fine. DNS servers are like the internet’s phonebook, translating website names into IP addresses. If there’s a problem with your DNS settings, websites may not load properly or at all.
Understanding DNS Server Functions
When you encounter DNS server issues, it usually manifests as a failure to load web pages, despite being connected to your network. This might be because your computer is having trouble translating website names into IP addresses.
To diagnose DNS problems:
- Check the DNS Server Status: Use command prompt to run
nslookup google.com. If it fails or times out, there might be an issue with your DNS settings. - Try Different Websites: If some websites work and others don’t, it’s a strong indication of DNS issues.
Configuring and Testing DNS Settings
Sometimes, the solution is as simple as changing your DNS server to a more reliable one, like Google DNS or OpenDNS.
Steps to change DNS settings:
- Open Network Settings:
- Go to the Control Panel, then Network and Sharing Center.
- Click on your connection and select ‘Properties’.
- Change DNS Settings:
- Select ‘Internet Protocol Version 4 (TCP/IPv4)’ and click ‘Properties’.
- Choose ‘Use the following DNS server addresses’.
- Enter preferred and alternate DNS server addresses (e.g., Google DNS: 8.8.8.8 and 8.8.4.4).
- Test the New Settings:
- After applying the changes, restart your browser and try accessing websites.
- Run
nslookup google.comin the command prompt to test the new DNS server.
How to Perform Ping and Route Tracing
Performing a ping test and tracing the route of your internet connection can provide valuable insights into the health and efficiency of your network. These tools help you understand if there are problems in the network pathway between your computer and the website or service you’re trying to reach.
Using Command Line Tools for Network Testing
A ping test checks the connection between your computer and a remote server. Here’s how to do it:
- Open Command Prompt:
- Press the Windows key, type
cmd, and hit Enter.
- Press the Windows key, type
- Run a Ping Test:
- In Command Prompt, type
ping [website address](for example,ping google.com) and press Enter. - Look at the response times. Longer times or timeouts indicate a problem.
- In Command Prompt, type
- Understanding Ping Results:
- Success: Short response times indicate a healthy connection.
- Timeouts or High Response Times: These suggest problems in your network or with the specific website.
Interpreting Ping and Traceroute Results
Traceroute is another useful tool that shows the path your data takes to reach its destination.
- Run a Traceroute Test:
- In Command Prompt, type
tracert [website address]and press Enter.
- In Command Prompt, type
- Analyze the Output:
- The results will list the series of steps (or ‘hops’) your data takes.
- Look for any steps where response times are significantly high or where requests time out.
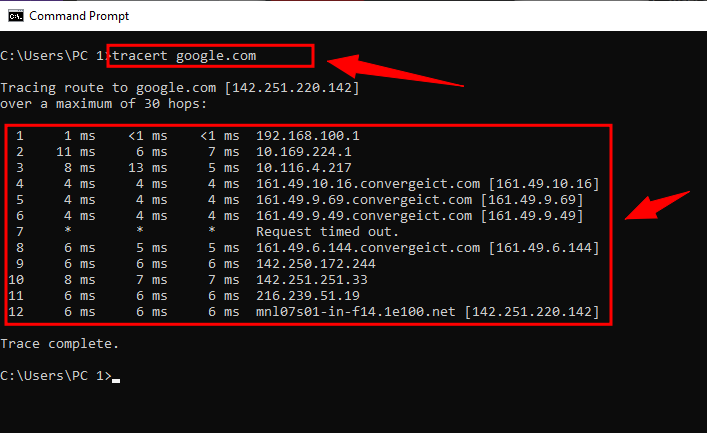
Both ping and traceroute tests help identify where the connection problems are occurring in your network path. They can reveal whether the issue is within your home network, with your ISP, or further along the route. These tests are essential for diagnosing network slowdowns or failures and can be incredibly helpful when communicating issues to your ISP or network support team.
How to Address IP Address Conflicts
IP address conflicts occur when two or more devices on the same network are assigned the same IP address. This can lead to various network issues, including devices being unable to access the internet. Resolving IP conflicts is crucial for a smoothly functioning network.
Avoiding Duplicate and Static IP Issues
IP conflicts are often caused by incorrect network settings or issues with the router’s DHCP (Dynamic Host Configuration Protocol) service. Here’s how to address and avoid these conflicts:
- Restart Your Router:
- Often, simply restarting your router can resolve IP conflicts as it will reassign IP addresses to devices.
- Set Devices to Obtain IP Address Automatically:
- Ensure your devices are set to receive IP addresses automatically from the router.
- This setting is found in the network settings of each device.
- Check for Static IP Addresses:
- Avoid manually setting static IP addresses unless necessary.
- If you must use a static IP, ensure it’s outside the range that the router automatically assigns (check your router settings for this range).
Setting Up DHCP Correctly
Your router’s DHCP settings play a key role in managing IP addresses on your network. Here’s how to check and adjust these settings:
- Access Router Settings:
- Enter your router’s IP address in a web browser and log in to its settings page.
- Locate DHCP Settings:
- Look for the DHCP section (this might be under LAN settings or similar).
- Ensure DHCP is Enabled:
- Make sure DHCP is turned on. This allows your router to assign IP addresses dynamically.
- Set the Address Range:
- If possible, set the range of IP addresses that the router can assign. This helps prevent conflicts.
Conclusion: Final Steps in Network Troubleshooting
Troubleshooting network issues can be a straightforward process when you approach it methodically. We’ve covered various steps, from the basics like checking your physical connections and running network troubleshooters, to more advanced tactics like verifying IP address validity and resolving DNS server problems. Each of these steps plays a crucial role in diagnosing and solving the common network issues you might encounter.
Remember, patience and a systematic approach are your best tools in this process. If you’ve gone through these steps and still face issues, it might be time to contact your ISP or a network professional. They can offer more advanced support and solutions. With the knowledge you’ve gained, you’ll be better equipped to describe the problem, which can lead to a quicker and more effective resolution. Keep this guide handy, and you’ll feel more confident in tackling network issues in the future.
1. Pa