Struggling to Build a Gaming PC? Here’s Your Ultimate Step-by-Step Guide
Have you ever dreamed of creating your own gaming PC? Building a gaming PC can seem like a big task, but it’s actually an exciting journey that brings a lot of satisfaction. When you build your own PC, you get to pick every part, ensuring it meets your gaming needs and preferences. This guide is here to help you through each step, making the process simple and enjoyable.
Think of building a PC like putting together a high-tech puzzle. Each piece has its place, and when they all come together, they create something powerful and fun. Whether you’re a first-timer or looking to upgrade your current setup, this guide is your friend. We’ll start with the basics, like the tools you’ll need and how to pick the right parts. Then, we’ll move on to the assembly, where we’ll connect each component with care.
So, why build a gaming PC? Well, it’s not just about playing games. It’s about learning new skills, understanding technology better, and feeling the pride of using something you’ve built with your own hands. Plus, building your own PC can be more cost-effective than buying a pre-made one. You get to choose where to spend more and where to save, tailoring the computer to both your budget and your gaming goals.
Preparing for the Build
Before diving into the exciting process of building your gaming PC, it’s important to get everything ready. This means gathering your tools and understanding the parts you’ll need. Think of it as laying the foundation for a successful build.
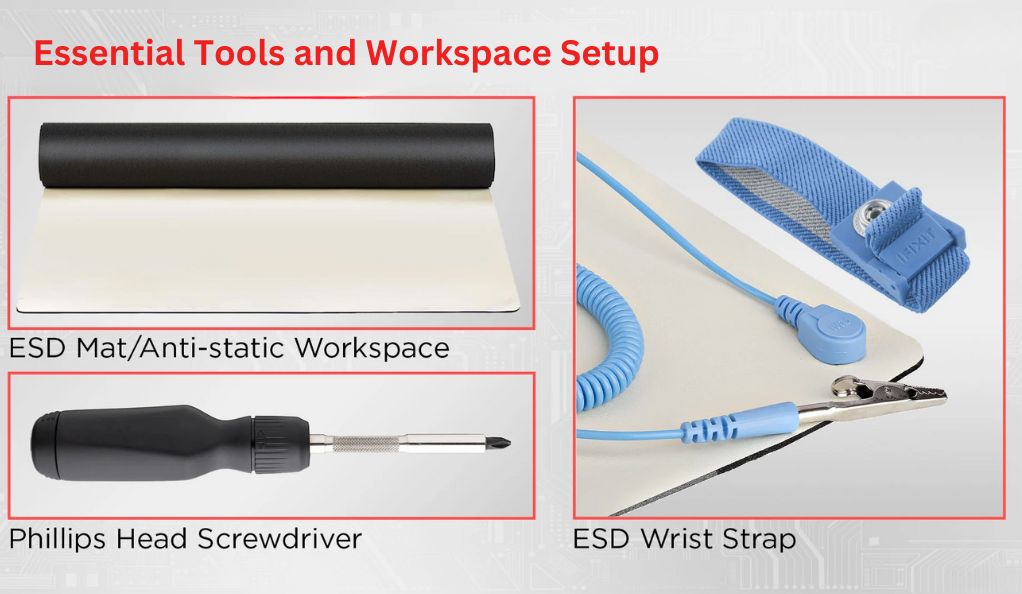
Essential Tools and Workspace Setup
Tools You’ll Need:
- A medium-sized Phillips screwdriver: This is a must for most screws in PC building.
- Anti-static wrist strap: This helps to prevent static electricity from damaging the PC parts.
- Small containers: Handy for keeping screws and small parts from getting lost.
Workspace Tips:
- Choose a clean, well-lit area: A spacious table or desk works great.
- Avoid carpeted areas: They can create static electricity.
- Keep your workspace clutter-free: This makes it easier to focus on your build.
Understanding PC Components
Building a gaming PC involves several key parts, each playing a specific role. Here’s a quick rundown:
- CPU (Central Processing Unit): The brain of your computer, handling all the instructions you give it.
- Motherboard: Where all the components connect and communicate.
- RAM (Random Access Memory): Helps your PC perform tasks quickly.
- Graphics Card: Essential for high-quality gaming visuals.
- Storage (SSD/HDD): Where all your files and games are stored.
- Power Supply Unit (PSU): Powers all the components in your PC.
- PC Case: The outer shell that holds and protects your components.
Choosing the Right Components
When selecting parts, consider the following:
- Compatibility: Make sure all your components work together. For example, the CPU must fit the motherboard’s socket.
- Performance: Choose parts that meet your gaming needs. If you play demanding games, invest in a better graphics card.
- Budget: Decide how much you want to spend. More expensive doesn’t always mean better for your needs.
Bullet Lists:
- For a Gaming PC:
- Powerful CPU and graphics card.
- At least 16GB of RAM.
- SSD for faster load times.
- For a General Use PC:
- Moderate CPU.
- 8GB of RAM is usually enough.
- HDD for storage if budget is tight.
Preparing for your PC build is like setting up for a big adventure. Take the time to gather your tools and understand each component. This way, you’ll be all set to build a PC that’s perfect for you. Remember, the goal is to create a machine that you’ll love using every day.
Selecting Core Components
Choosing the right core components is crucial in building a gaming PC. These components are the heart and soul of your machine, determining how well it performs in your favorite games.
The Heart of Your PC: Choosing a CPU
The CPU, or Central Processing Unit, is like the brain of your computer. It handles all the instructions and processes everything you do. Here’s how to choose the right one:
- For Gaming: Look for CPUs with higher speeds and more cores. This means they can handle more tasks at once.
- For General Use: A CPU with fewer cores and moderate speed is fine.
- Consider Your Budget: More expensive CPUs are usually faster, but mid-range ones can still provide a great gaming experience.
The Brain Behind the Operations: Selecting a Motherboard
The motherboard is the platform where all your components connect. It’s important to choose one that fits your needs:
- Size Matters: Make sure it fits in your PC case.
- Compatibility: Check that it’s compatible with your CPU and RAM.
- Features: Look for additional features like Wi-Fi or extra USB ports if you need them.
Visual Powerhouse: Graphics Card Selection
For gamers, the graphics card is key. It’s what creates the images you see on screen. Here’s what to consider:
- High Performance for Gamers: If you play visually demanding games, look for high-performance graphics cards.
- Budget-Friendly Options: For casual gaming, a mid-range card might be enough.
- Check Compatibility: Ensure it fits your motherboard and there’s enough space in your case.
Quick Reference:
- CPU Choices:
- High-End: Intel Core i9 or AMD Ryzen 9
- Mid-Range: Intel Core i5 or AMD Ryzen 5
- Budget: Intel Core i3 or AMD Ryzen 3
- Motherboard Types:
- ATX: Standard size, fits most cases.
- Micro-ATX: Smaller, less expansion but still versatile.
- Mini-ITX: Very small, for compact builds.
- Graphics Cards:
- High-End: NVIDIA RTX 3080 or AMD Radeon RX 6800 XT
- Mid-Range: NVIDIA GTX 1660 or AMD Radeon RX 5600 XT
- Budget: NVIDIA GTX 1650 or AMD Radeon RX 550
Selecting your core components carefully ensures your PC will run smoothly and perform well in your favorite games. Remember, it’s all about finding the right balance between performance and budget.
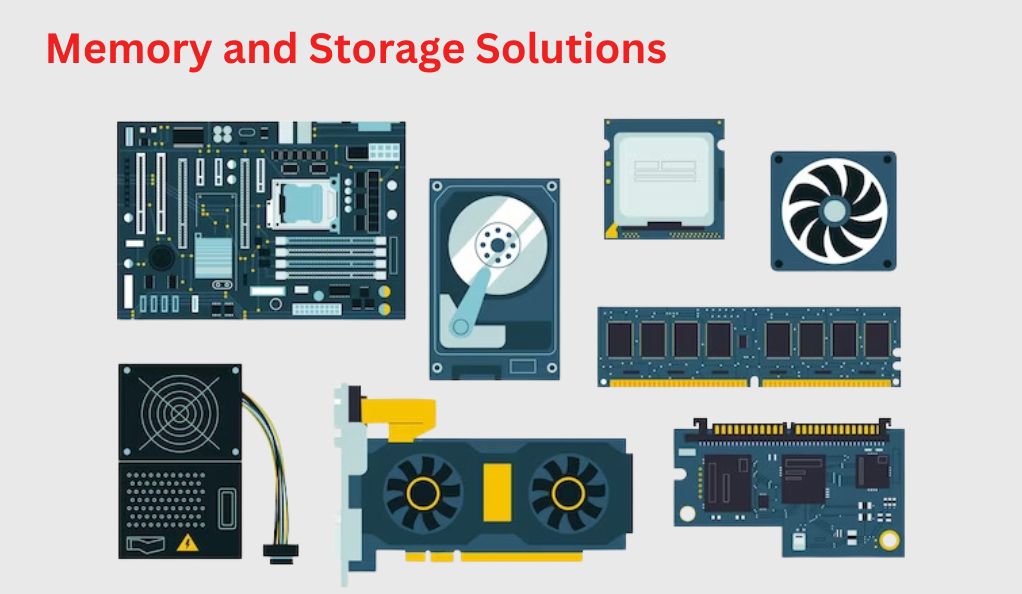
Memory and Storage Solutions
Memory and storage are key components of your PC, impacting its speed and how much you can store. Let’s explore how to choose the right memory (RAM) and storage options (SSD or HDD) for your gaming PC.
RAM: Ensuring Smooth Performance
RAM (Random Access Memory) is like your computer’s short-term memory. It plays a big role in how fast your PC can run programs and games. Here’s what to consider:
- Amount: For gaming, 16GB of RAM is a good starting point. More RAM means smoother multitasking.
- Speed: Look for higher speed RAM for better performance, but make sure it’s compatible with your motherboard.
- Upgradability: Check if there are extra RAM slots on your motherboard for future upgrades.
Storage: SSDs vs HDDs
Your PC’s storage is where all your files, games, and programs are kept. There are two main types: SSDs (Solid State Drives) and HDDs (Hard Disk Drives).
- SSDs: These are faster and more reliable but usually more expensive. They’re great for quick load times in games.
- HDDs: These offer more storage space for a lower price but are slower than SSDs. They’re good for storing large files like movies.
Quick Reference:
- SSD Pros and Cons:
- Pros: Faster, more reliable, less likely to get damaged.
- Cons: More expensive per GB of storage.
- HDD Pros and Cons:
- Pros: Cheaper, more storage capacity.
- Cons: Slower, more prone to damage from drops or bumps.
When choosing memory and storage, think about what you’ll use your PC for. Gamers might prioritize a faster SSD for quick game loading, while someone storing lots of files might want a large HDD. Remember, you can always mix and match: many people use a smaller SSD for their operating system and most-used programs, and a larger HDD for other files.
Powering Your PC
A reliable power supply unit (PSU) is essential for bringing your gaming PC to life. It’s the component that supplies power to every other part in your build. Choosing the right PSU ensures that your PC runs smoothly and efficiently.
Choosing a Power Supply Unit (PSU)
When selecting a PSU, consider these key factors:
- Wattage: The total power your PC components need. Use a PSU wattage calculator online to estimate the required wattage. For most gaming PCs, a PSU ranging from 500W to 850W is sufficient.
- Efficiency Rating: PSUs come with efficiency ratings like 80 Plus Bronze, Silver, Gold, or Platinum. Higher efficiency means less electricity waste and potentially lower energy bills.
- Modularity: Modular PSUs let you use only the cables you need, which can help with cable management and airflow in your PC case.
Calculating Power Requirements
To calculate your power needs:
- List Your Components: Include your CPU, graphics card, RAM, fans, and any other peripherals.
- Check Individual Power Requirements: Look at the power usage of each component.
- Use an Online Calculator: Input your components to get an estimated wattage requirement.
- Add a Buffer: It’s good practice to get a PSU with slightly more wattage than your calculation. This gives room for future upgrades and ensures stable power delivery.
The Importance of Cooling Systems
Keeping your gaming PC cool is crucial for maintaining performance and extending its life. Overheating can cause slow-downs and damage components. This is where cooling systems come in, ensuring your PC runs at an optimal temperature.
Air Cooling vs Liquid Cooling
There are two main types of cooling systems: air cooling and liquid cooling. Each has its advantages.
- Air Cooling: This is the most common method, using fans to circulate air through your PC. It’s affordable and easy to install. For most users, a good air cooling system with a few case fans is enough to keep the temperature down.
- Liquid Cooling: Liquid cooling systems use a liquid coolant to absorb heat from components and move it away from crucial parts. These are more efficient and quieter but can be more expensive and complex to set up. They’re ideal for high-performance gaming PCs or overclocking.
Installing CPU Coolers and Case Fans
- CPU Coolers: Your CPU generates a lot of heat, especially when gaming or performing heavy tasks. A dedicated CPU cooler is essential. Make sure it’s compatible with your CPU and fits in your case.
- Case Fans: These fans help circulate air within your PC case, removing hot air and bringing in cool air. Consider the size of your case and the number of fan slots available when choosing case fans.
Quick Reference:
- Choosing a CPU Cooler:
- Check CPU and socket compatibility.
- Decide between air and liquid based on your needs and budget.
- Look for coolers with good reviews and efficient heat dissipation.
- Selecting Case Fans:
- Measure the fan slots in your case to get the right size (common sizes are 120mm and 140mm).
- More fans can mean better cooling but also more noise. Balance your needs.
- Consider the airflow pattern in your case for optimal cooling.
A well-cooled PC not only performs better but also lasts longer. By choosing the right cooling system and properly installing CPU coolers and case fans, you can ensure your gaming PC stays cool under pressure, ready for any gaming marathon or intensive task.
Assembling Your Gaming PC
Now that you have all your components, it’s time to put them together. Assembling a PC can be a rewarding experience. Let’s go through the steps to build your gaming rig.

Installing the Motherboard
- Preparation: First, place your case flat on your workspace and remove the side panels.
- Motherboard Placement: Carefully lift the motherboard by its edges and align it with the standoffs in the case.
- Securing: Use the screws provided with your case to secure the motherboard. Don’t overtighten, just ensure it’s snug and stable.
CPU and Cooler Installation
- CPU Insertion: Open the CPU socket on your motherboard. Gently place the CPU in the socket, aligning it correctly (look for a corner marker). No force is needed.
- Applying Thermal Paste: If your cooler doesn’t have pre-applied thermal paste, apply a pea-sized amount on the center of the CPU.
- Cooler Mounting: Place the cooler on the CPU and secure it with the provided mechanism. Plug any cooler fan cables into the motherboard.
Adding RAM and Storage Devices
- RAM Installation: Open the RAM slots on your motherboard. Align the notches on your RAM sticks with the slot and press down evenly until the side clips snap into place.
- Storage Devices: Mount your SSDs or HDDs in the designated slots or bays. Connect them to the motherboard with SATA cables and to the power supply.
Power Supply and Wiring
- PSU Placement: Fit the power supply into its bay, typically at the bottom of the case. Secure it with screws.
- Connecting Cables: Connect the power cables from the PSU to the motherboard, CPU, graphics card, and storage devices. Refer to your motherboard manual for the correct slots.
Graphics Card Installation
- Preparing the Slot: Remove the backplate covers on your case corresponding to the PCIe slot you’ll use.
- Inserting the Card: Carefully align the graphics card with the PCIe slot and press down evenly until it clicks into place.
- Securing: Use a screw to secure the card to the case. Connect any required power cables from the PSU to the card.
Final Steps and Testing
After assembling your gaming PC, you’re almost ready to start gaming. But first, it’s important to do some final checks and tests to ensure everything is working correctly.
Cable Management Techniques
Good cable management is crucial for both aesthetics and airflow. Here’s how to manage your cables effectively:
- Routing: Run cables along the sides or back of the case to keep them out of the way.
- Tying: Use zip ties or Velcro straps to bundle loose cables together.
- Hiding: Tuck excess cables into unused drive bays or behind the motherboard tray.
Enclosure: Choosing and Preparing Your PC Case
Before closing up your PC case, do a quick check:
- Ensure all components are securely in place.
- Double-check that all cables are connected correctly.
- Make sure the fans are not obstructed by cables.
First Boot and BIOS Setup
Now, it’s time for the first boot:
- Power On: Connect your monitor, keyboard, and mouse. Turn on the power supply and press the power button on the case.
- Enter BIOS: Press the key indicated on the screen (often Del or F2) to enter the BIOS.
- BIOS Setup: In the BIOS, you can set up hardware configurations. Check that your RAM is recognized and running at the correct speed, and your CPU and storage devices are detected.
- Save and Exit: After making any changes, save your settings and exit the BIOS.
Installing the Operating System
With your gaming PC assembled and initial tests completed, the next big step is installing the operating system (OS). The OS is like the conductor of your PC, managing all software and hardware. For gaming PCs, Windows is the most popular choice due to its wide compatibility with games and hardware.
Choosing Between Windows 10 and 11
- Windows 10: Known for its stability and compatibility with older software and hardware.
- Windows 11: Offers the latest features and is optimized for newer hardware.
Installation Process
- Create Installation Media: If you haven’t already, you’ll need a USB drive with at least 8GB of space. Use another computer to download the Windows Media Creation Tool and create a bootable USB drive.
- Boot from USB: With the USB drive inserted, power on your PC and enter the BIOS (as previously mentioned). Set the USB drive as the primary boot device.
- Follow Installation Steps: The Windows setup will guide you through the process. You’ll select language, time, keyboard preferences, and agree to the terms.
- Drive Partitioning: When prompted, choose where to install Windows. If your SSD or HDD is new, you’ll need to format and partition it.
- Complete the Setup: Windows will continue the installation process. Once it’s done, it will restart, and you can remove the USB drive.
- Install Drivers: After installation, make sure to install the latest drivers for your motherboard, GPU, and any other components.
Optimization and Upgrades
Once your gaming PC is up and running with an operating system, it’s time to optimize its performance and consider future upgrades. This step ensures that you get the most out of your PC, both in terms of gaming prowess and overall efficiency.
Updating Drivers and Software
Keeping your drivers up to date is crucial for optimal performance:
- Graphics Card Drivers: Regularly update your GPU drivers for the best gaming experience. NVIDIA and AMD frequently release updates that enhance game performance and add new features.
- Motherboard Drivers: Visit your motherboard manufacturer’s website to download the latest drivers. This can include audio, network, and chipset drivers.
- Windows Updates: Regularly check for and install Windows updates, which can provide important security patches and performance improvements.
Overclocking for Enhanced Performance
Overclocking can boost the speed of your CPU or GPU beyond its default setting:
- Research: Before overclocking, understand the risks and learn about your specific components.
- Use Reliable Software: Use trusted tools like MSI Afterburner for GPUs or Intel Extreme Tuning Utility for Intel CPUs.
- Monitor Temperatures: Keep an eye on your system’s temperatures to avoid overheating.
Future Proofing and Upgrades
Plan for future upgrades to keep your PC at the cutting edge:
- Upgrade Path: Consider which components you might want to upgrade in the future, such as adding more RAM, upgrading the GPU, or expanding storage.
- Compatibility: Ensure future upgrades are compatible with your existing components, especially the motherboard and power supply.
- Budgeting: Set aside a budget for upgrades, keeping an eye on the latest technology trends and price drops.
Conclusion
In conclusion, building and optimizing your own gaming PC is a deeply rewarding journey, blending technical skills with personal expression. From selecting the right components that balance performance and budget to the meticulous process of assembly, each step brings its own satisfaction. By following the guidelines for choosing core components, understanding the importance of cooling systems, and carefully assembling your PC, you create a machine that’s uniquely yours. The installation of an operating system is the final step that brings your creation to life, ready to explore vast gaming worlds. However, the journey doesn’t end there; regular updates, optimizations, and considering future upgrades ensure that your gaming PC not only meets the current demands but is also prepared for future gaming adventures. Embrace the continuous learning and evolving nature of PC gaming, and enjoy the immense satisfaction and pride that comes from gaming on a system you built and maintain.