Fixing Apple ID Server Connection Errors – Comprehensive Guide
If you’re an iPhone or iPad user, you’re likely familiar with Apple ID. It’s the key to unlocking various Apple services like iCloud, App Store, and more. But what happens when you face the dreaded message, “There was an error connecting to the Apple ID server”? It’s not just annoying; it can stop you from downloading apps or accessing important data.

In our daily lives, we rely heavily on our devices and the services they provide. Any disruption, like a server connection error, can be a significant inconvenience. This guide aims to help you understand and fix these connection errors with Apple ID. Whether you’re a tech expert or a casual user, our step-by-step approach will assist you in resolving these issues efficiently.
Understanding the problem is the first step to solving it. We’ll explore the common causes of Apple ID server errors and provide practical solutions. From checking your internet connection to more advanced troubleshooting steps, this guide covers it all. So, let’s dive in and get your Apple services running smoothly again.
Understanding Apple ID Server Errors
Experiencing an Apple ID server error can be a roadblock, especially when you’re trying to access various Apple services. It’s crucial to understand that this error typically means your device is having trouble communicating with Apple’s servers. Since your Apple ID is your passport to services like the App Store, iCloud, and more, resolving these errors is important.
Why Do These Errors Occur?
Several reasons can lead to this error:
- Network Issues: Just like a car needs a smooth road to travel, your device needs a stable internet connection to reach Apple’s servers. If your internet is down or unstable, you’ll likely face this error.
- Apple Server Downtime: Sometimes, the problem isn’t on your end. Apple’s servers themselves might be undergoing maintenance or experiencing issues, blocking your access.
- Incorrect Device Settings: Think of this as having the wrong map. If your device settings, especially date and time, are incorrect, they can lead you to a dead end with server connection.
Understanding these causes is the first step in troubleshooting.
How to Identify and Resolve the Cause
To determine and fix the cause of this error, follow these steps:
- Check Your Internet Connection:
- Ensure your device is connected to Wi-Fi or has cellular data enabled.
- Try opening a website in your browser to test if your internet is active.
- Visit Apple’s System Status Page:
- Navigate to Apple’s System Status Page on your browser.
- Look for green dots next to services, indicating they are operational.
- If you see any other color, like yellow or red, it means there are issues with those services.
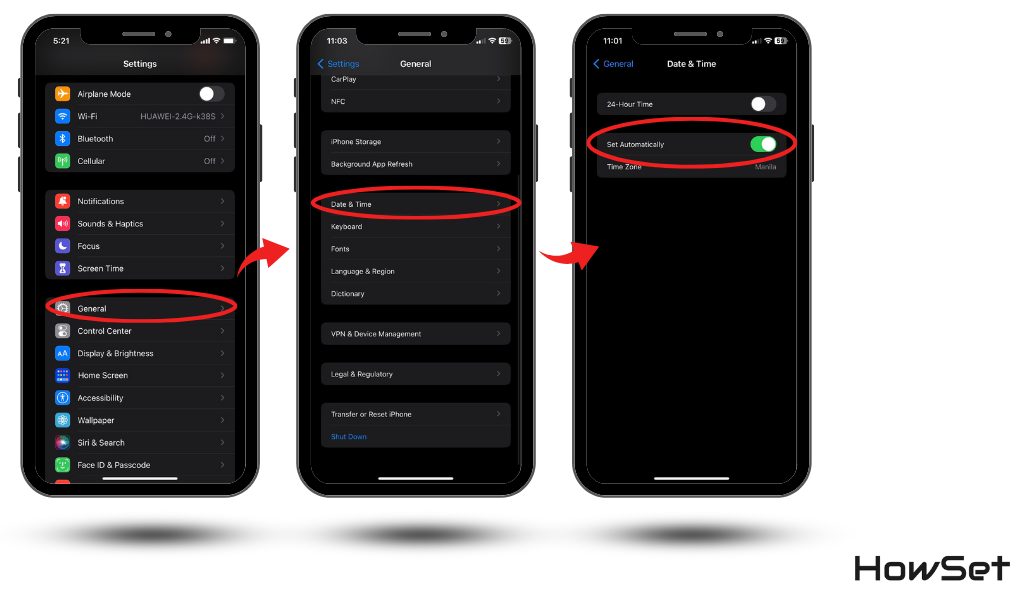
- Review and Adjust Device Settings:
- Go to your device’s ‘Settings.’
- Scroll to ‘General’ and tap on ‘Date & Time.’
- Ensure ‘Set Automatically’ is enabled. This ensures your device’s date and time are always correct, which is vital for connecting to Apple’s servers.
Understanding the reasons behind these errors and knowing how to check each potential cause is the first step towards resolving them. Remember, these issues are common and can often be sorted out with a few simple checks and adjustments. By following these steps, you can get back to using your Apple services without interruption.
Checking Apple ID Server Status
Before diving into more complex solutions, it’s wise to start with a simple step: checking the status of Apple’s servers. This can be done quickly and easily, and it helps you understand whether the problem is on your end or Apple’s.
Here’s how to check Apple ID server status:
- Visit the Apple System Status Page: Apple provides an online status page where you can see a list of their services, including Apple ID.
- Look for Apple ID: On this page, find ‘Apple ID’ in the list of services.
- Check the Indicator: Next to ‘Apple ID’, there will be an indicator. If it’s green, the servers are working fine. If it’s any other color, there might be issues on Apple’s end.
By checking this page, you can save yourself a lot of time troubleshooting if the problem is actually with Apple’s servers.
Understanding the Server Status Indicators
Each service on the Apple System Status page has a color indicator. Here’s what they mean:
- Green: The service is operational with no known issues.
- Yellow: There is a temporary issue that Apple is aware of and likely fixing.
- Red: There is a significant issue with the service.
What to Do If Apple’s Servers Are Down
If you find that Apple ID’s indicator is yellow or red, the best course of action is to wait. These issues are typically resolved quickly by Apple. Keep checking the status page for updates. Once the indicator turns green, try accessing Apple ID services again.

Remember, if Apple’s servers are fine (green indicator), the issue might be related to your device or network. In that case, you can move on to the next steps of troubleshooting, which involve checking your network connection and device settings. We will cover these in the upcoming sections to help you regain access to your Apple ID services.
Basic Troubleshooting Steps
If the Apple ID server is up and running, the next step is to try some basic troubleshooting on your device. These steps are simple and can often solve the problem without needing more complex solutions.
Here are some basic things you can do:
- Check Your Internet Connection: Make sure your device is connected to the internet. A poor or unstable connection can cause server connection issues.
- Restart Your Device: Sometimes, simply turning your device off and then back on can clear up any minor glitches.
- Update Your Device: Ensure your device is running the latest version of its operating system. Updates often include fixes for common issues.
Dealing with iOS Glitches
iOS glitches can sometimes cause Apple ID server errors. These glitches are small faults in the operating system of your iPhone or iPad. Luckily, there are ways to fix these glitches which can help resolve your Apple ID issues.
Updating iOS Software
One of the best ways to fix iOS glitches is by updating your device’s software. Apple regularly releases updates that fix known bugs and improve overall performance.
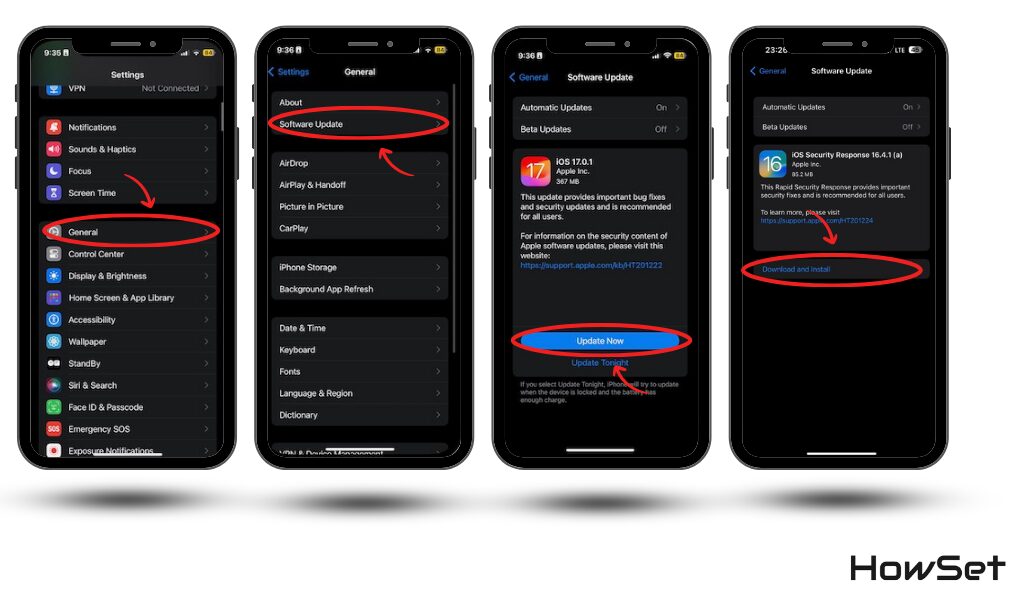
How to Update iOS:
- Connect to Wi-Fi: Make sure your device is connected to a stable Wi-Fi network.
- Go to ‘Settings’: Open the Settings app on your device.
- Navigate to ‘General’: Tap on ‘General.’
- Select ‘Software Update’: Here, you’ll see if there are any updates available.
- Download and Install: If an update is available, tap ‘Download and Install.’ Follow the onscreen instructions to complete the update.
Restarting Your Device
Sometimes, a simple restart can fix minor glitches that might be causing Apple ID server errors.
Steps to Restart Your Device:
- Press and Hold the Power Button: For most devices, this is either on the side or top of your iPhone or iPad.
- Slide to Power Off: A slider will appear on the screen. Drag it to turn off your device.
- Wait a Few Seconds: Once your device is off, wait for about 30 seconds.
- Turn It Back On: Press and hold the power button again until you see the Apple logo.
Resetting Network Settings
If the issue is related to network glitches, resetting your network settings can help.
How to Reset Network Settings:
- Go to ‘Settings’: Open the Settings app on your device.
- Tap ‘General’: Scroll down and select ‘General.’
- Select ‘Reset’: At the bottom of the General settings, find and tap ‘Reset.’
- Choose ‘Reset Network Settings’: This will reset Wi-Fi networks and passwords, cellular settings, and VPN and APN settings.
By keeping your iOS updated, restarting your device, and resetting network settings, you can effectively deal with many iOS glitches that might be causing Apple ID server errors. These steps are simple but can be very effective in ensuring your device runs smoothly.
These basic steps can resolve many common issues with Apple ID server connections. If these don’t work, don’t worry. There are more advanced steps you can take, which we will cover in the next sections. Remember, sometimes the simplest solutions can be the most effective, so it’s worth trying these first.
Advanced Solutions to Fix Apple ID Errors
If the basic steps didn’t resolve the issue, it’s time to try some advanced methods. These steps are a bit more detailed and might require you to change some settings on your device. They are still easy to follow and can be very effective.
Here are some advanced solutions to consider:
- Sign Out and Re-sign Into Apple ID: Sometimes, resetting your Apple ID session can fix connection issues.
- Change Your Apple ID Password: Changing your password can resolve issues related to account verification.
- Modify Date & Time Settings: Incorrect settings can prevent your device from connecting to Apple’s servers.
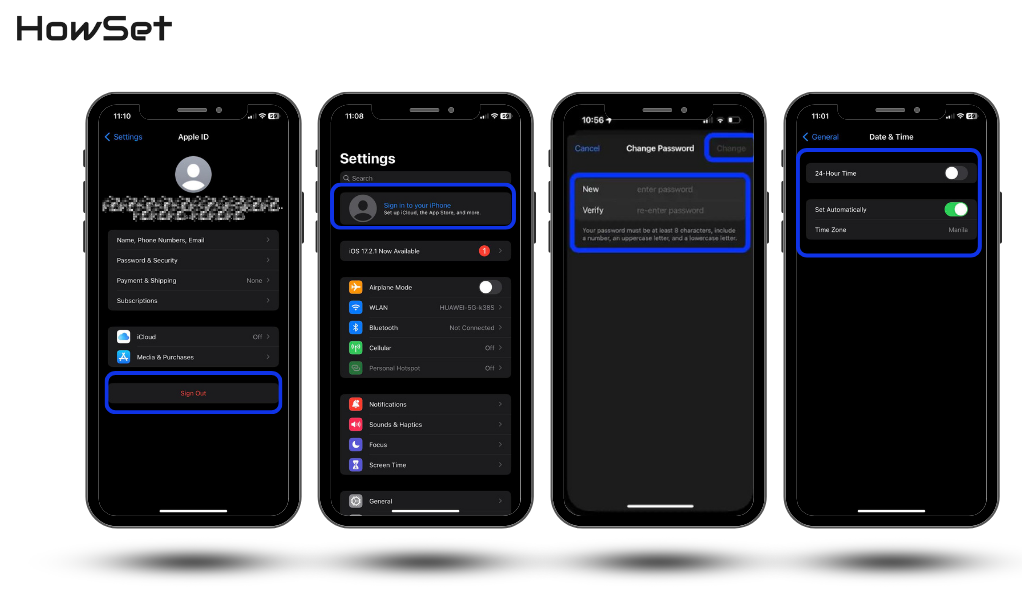
Signing Out and Re-signing Into Apple ID
- Go to Settings: Open your device’s settings.
- Sign Out: Tap on your Apple ID at the top and scroll down to find the ‘Sign Out’ option.
- Sign Back In: After signing out, enter your Apple ID and password to sign back in.
Changing Your Apple ID Password
- Access Settings: Navigate to the settings on your device.
- Password & Security: Tap on your Apple ID, then select ‘Password & Security’.
- Change Password: Follow the prompts to change your password.
Modifying Date & Time Settings
- Open Settings: Go to your device’s settings.
- Date & Time: Tap on ‘General’ and then ‘Date & Time’.
- Set Automatically: Ensure the ‘Set Automatically’ option is toggled on. This ensures your device has the correct date and time, which is crucial for server communication.
Using Apple ID Verification Code
When you’re dealing with Apple ID server errors, one helpful tool is the Apple ID verification code. This is a security feature provided by Apple to keep your account safe. Sometimes, using this code can help bypass server connection issues, especially if the problem is related to account verification.
What is an Apple ID Verification Code?
The Apple ID verification code is a short numerical code that Apple sends to your device or phone number. This code is used to confirm your identity when signing in to your Apple ID account on a new device or browser.
How to Use the Apple ID Verification Code
Follow these simple steps to use the verification code:
- On Your Device:
- Go to ‘Settings’ on your iPhone or iPad.
- Tap on your name at the top, which is your Apple ID profile.
- Choose ‘Password & Security.’
- Tap ‘Get Verification Code.’
- On a Trusted Device:
- If you have another device using the same Apple ID, you can also get a code there.
- On the trusted device, navigate to ‘Settings.’
- Tap on your Apple ID, then go to ‘Password & Security.’
- Select ‘Get Verification Code.’
- Using the Code:
- Once you receive the code, enter it on the device where you are experiencing the Apple ID server error.

- This can help verify your identity and might resolve the login issue.
Tips for Using Verification Codes
- Keep Your Trusted Devices Handy: Make sure you have access to at least one trusted device where you can receive the verification code.
- Note the Time Limit: The verification code is only valid for a short period. Use it as soon as you get it.
- Double-Check Your Number: If you’re using a phone number to receive the code, ensure it’s correct and updated in your Apple ID settings.
Using the Apple ID verification code can be a quick and effective way to overcome server connection issues. It’s a simple step but can make a significant difference in accessing your Apple services seamlessly.
These advanced steps address more specific aspects of your device that can affect its ability to connect to Apple ID servers. If you’re still encountering issues after trying these methods, it could be a more complex problem with your device or account. In such cases, it might be best to contact Apple Support for further assistance. They can provide more personalized troubleshooting based on your specific situation.
Remember, solving technical issues can sometimes be a process of trial and error. Patience and careful attention to each step can lead to a successful resolution. It’s important to follow these steps carefully to ensure the best chance of fixing the problem. If you’re unsure about any step, Apple’s support website offers detailed guides and support articles that can be very helpful.
Turning off Features like iCloud Backup, Limit IP Address Tracking
Sometimes, specific features on your iOS device, like iCloud Backup and IP Address Tracking, can interfere with your Apple ID’s connection to the server. Turning off these features temporarily can help you identify if they are the cause of your connectivity issues.
Disabling iCloud Backup
iCloud Backup is a feature that automatically saves copies of your data to iCloud. If there’s a problem with your iCloud account, this could affect your Apple ID connection.
Steps to Disable iCloud Backup:
- Open ‘Settings’: Tap the Settings icon on your device.
- Tap Your Name/Apple ID: This is at the top of the Settings menu.
- Go to ‘iCloud’: Find and tap on ‘iCloud.’
- Select ‘iCloud Backup’: This option is usually towards the bottom.
- Turn Off iCloud Backup: Tap the toggle to turn it off.
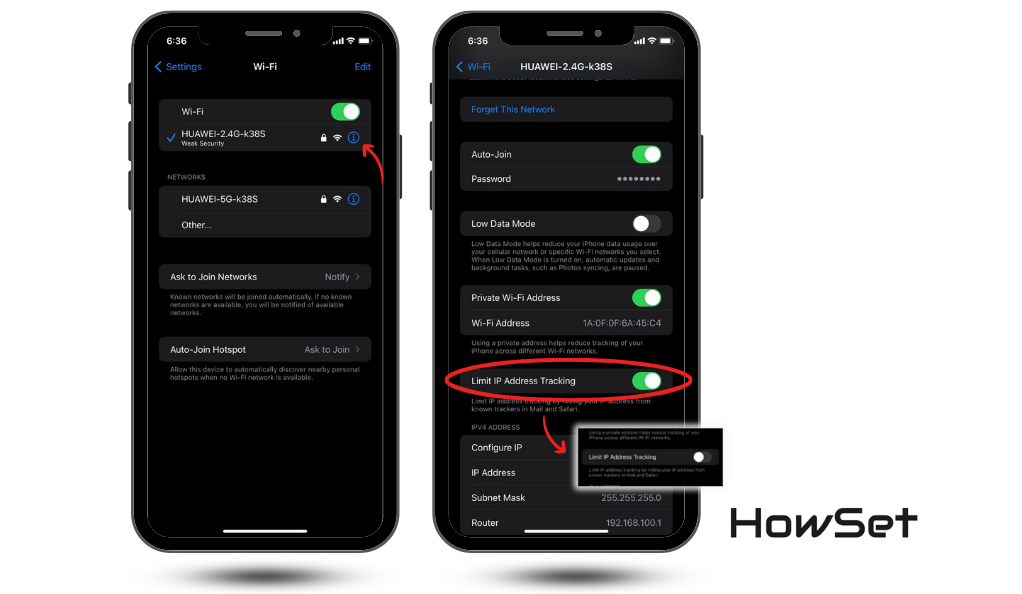
Turning Off Limit IP Address Tracking
Limit IP Address Tracking is a privacy feature that can sometimes cause connectivity issues, including with the Apple ID server.
How to Turn Off Limit IP Address Tracking:
- Access ‘Wi-Fi’ Settings: Open the Settings app and tap on ‘Wi-Fi.’
- Find Your Network: Tap on the information (i) icon next to your Wi-Fi network.
- Disable ‘Limit IP Address Tracking’: If this option is enabled, turn the toggle off.
By disabling these features, you can test if they are the source of your Apple ID server errors. If your connection improves after turning these off, you may need to adjust your settings or contact Apple Support for further assistance. Remember to turn these features back on once you’ve finished testing, as they are important for your device’s functionality and security.
Using Third-Party Tools for System Repair
When the usual fixes don’t work, third-party tools can be a great help. These tools are designed to repair common system issues in iOS devices, including those that cause Apple ID server errors.
Choosing the Right Tool
There are many third-party tools available, but it’s important to choose one that’s reliable and trustworthy. Look for tools with good reviews and a strong track record.
How to Use These Tools
Using third-party tools usually follows a similar process:
- Download and Install: Choose a tool and install it on your computer.
- Connect Your Device: Use a USB cable to connect your iPhone or iPad to the computer.
- Follow the Instructions: The tool will typically guide you through the steps to diagnose and fix your device.
- Perform the Repair: The software may download the necessary firmware and then proceed to repair your device’s system.
Things to Remember:
- Backup Your Data: Before using any repair tool, back up your device to avoid any data loss.
- Follow Instructions Carefully: Make sure to follow the tool’s instructions to avoid further issues.
- Check Compatibility: Ensure the tool is compatible with your device and iOS version.
Third-party tools can be a lifesaver when you’ve tried everything else. They’re especially useful for solving problems that are hard to diagnose and fix manually. Remember to use these tools responsibly and only as a last resort after trying the standard troubleshooting methods.
Conclusion
In conclusion, dealing with Apple ID server errors can be a hassle, but with the right steps, you can often solve the problem quickly and easily. We’ve explored various solutions, from simple ones like checking your internet connection and updating your iOS, to more advanced methods like using verification codes and adjusting specific device settings.