How to Enter Your PC’s BIOS: Essential Steps and Tips
Welcome to our guide on entering your PC’s BIOS. BIOS, which stands for Basic Input/Output System, is a crucial part of your computer. It’s like the brain that helps your PC start up and makes sure everything is running correctly. When you turn on your computer, the BIOS is the first thing that kicks into action, even before your operating system, like Windows, starts.
You might be wondering, “Why do I need to know about BIOS?” Well, sometimes you need to jump into the BIOS to make some changes. Maybe you want to boot your computer from a USB drive, or perhaps you’re troubleshooting a problem. Whatever the reason, knowing how to access your BIOS is an essential skill for any PC user.

In this article, we’re going to walk you through the steps to enter your computer’s BIOS. We’ll make it straightforward to understand, so you don’t need to be a tech expert to follow along. Whether you’re a beginner or just need a quick refresher, this guide will provide you with all the information you need. So let’s get started and learn about this vital part of your PC!
Remember, if you’re not sure about something, it’s always a good idea to ask for help or look up more information. The goal is to make you comfortable and confident in accessing and understanding your PC’s BIOS.
Understanding the Basics of BIOS
Before diving into the steps of accessing BIOS, it’s important to understand what BIOS is and why it’s a key part of your computer. Think of BIOS as the backstage crew in a theater. It works behind the scenes when you turn on your computer, making sure everything is set up correctly before the main show, which is your operating system, starts.
What is BIOS?
BIOS, or Basic Input/Output System, is the program that wakes up your computer when you turn it on. It’s stored on a small memory chip on the motherboard and its job is to:
- Check if your hardware like the keyboard, mouse, and hard drive are working.
- Set up the environment so that your operating system can start.
Basically, without BIOS, your computer wouldn’t know how to start. It’s like the starting point of your computer’s day.
The Evolution of BIOS Technology
Over the years, BIOS technology has gone through some big changes. Here’s a brief look at how BIOS has evolved:
- 1980s and 1990s: BIOS was pretty basic. It could only handle simple tasks and had limited storage capacity.
- Early 2000s: BIOS started to support more hardware and could handle bigger storage drives.
- Mid-2000s to Now: We saw the introduction of UEFI (Unified Extensible Firmware Interface). UEFI is like the modern version of BIOS. It’s faster, more powerful, and can support larger storage drives and more advanced features.
| Feature | Traditional BIOS | UEFI |
|---|---|---|
| Speed | Slower | Faster |
| Storage Limit | Up to 2.1 TB | More than 2.1 TB |
| Interface | Basic Text | Graphical User Interface |
By understanding the role and evolution of BIOS, you’ll have a better grasp of why it’s such an important part of your computer. In the next sections, we’ll look at how to access this essential tool.
How to Access BIOS: General Steps
Now that we understand what BIOS is and its evolution, let’s talk about how to access it. Accessing BIOS is not a daily task, but it’s something you might need to do from time to time, especially if you’re setting up your computer for the first time or troubleshooting. The process is quite straightforward, but it’s important to follow the steps carefully to ensure a smooth experience.
Preparing to Access BIOS
Before you start pressing keys and rebooting your computer, here are a few things to keep in mind:
- Fast Booting: Some computers boot up really fast, making it tricky to press the BIOS key in time. If your computer has a ‘Fast Boot’ option, you might want to disable it temporarily.
- Backup Your Data: It’s always a good idea to backup your important files before you make changes to your computer settings.
- Know Your Computer Brand: Different computer brands use different keys to access BIOS. Knowing your computer’s brand will help you figure out which key to use.
Standard Key Combinations for Access
Different computer manufacturers have set different keys for accessing BIOS. Here’s a list of some common key combinations used by major brands:
| Manufacturer | BIOS Access Key |
|---|---|
| HP | ESC or F10 |
| Dell | F2 or F12 |
| Lenovo | F2 or Fn + F2 |
| ASUS | F2 or DEL |
| Acer | F2 or DEL |
| MSI | DEL |
| Samsung | F2 |
| Toshiba | F2 |
- To enter BIOS, you need to press the correct key right after you start or restart your computer.
- Keep an eye on your screen; sometimes, it will display a message like “Press [Key] to enter Setup” for a few seconds.
- If you’re not sure about the key for your specific model, check the user manual or the manufacturer’s website.
Manufacturer-Specific Instructions
While the general steps to access BIOS are similar across different brands of computers, each manufacturer has its own specific way of doing things. In this section, we will go through the BIOS access methods for HP, Dell, and Lenovo computers. These steps are tailored to the unique features of each brand, ensuring you can get into BIOS without any hassle.
Accessing BIOS in HP PCs
For HP computer users, accessing the BIOS can be achieved with a few simple steps:
- Start or Restart Your HP Computer: Begin by either powering on your HP PC or restarting it if it’s already on.
- Press the BIOS Access Key: As soon as the computer starts, press the ‘ESC’ or ‘F10’ key. HP typically uses these keys for entering BIOS.
- Use the Boot Menu: If you press the ‘ESC’ key, you will see a boot menu. From here, you can select the BIOS setup option.
Remember, the key to success is timing – you need to press the key right after the computer starts but before the Windows logo appears.
BIOS Access on Dell and Lenovo
Dell and Lenovo also have their specific keys for accessing BIOS:
For Dell Computers:
- Power On or Restart: Start by either turning on your Dell PC or restarting it.
- Press the BIOS Key: Immediately after starting, press the ‘F2’ or ‘F12’ key. Dell often uses these for BIOS access.
- Enter Setup: Continue to press the key until you see the BIOS setup screen.
For Lenovo Computers:
- Starting the Computer: Begin by powering on or restarting your Lenovo PC.
- Press the BIOS Access Key: For Lenovo, the common keys are ‘F2’ or ‘Fn + F2’. Press one of these as soon as the computer starts.
- Lenovo ThinkPads: If you have a ThinkPad, you might need to press ‘Enter’ and then ‘F1’.
By following these manufacturer-specific instructions, you should be able to access the BIOS settings on your HP, Dell, or Lenovo computer without any problems.
Troubleshooting Common BIOS Access Issues
Sometimes, accessing BIOS can be a bit tricky. You might find yourself facing issues like your PC booting up too quickly or the standard keys not working. Don’t worry, though – these problems are common and can often be solved with a few simple steps. Let’s look at how you can troubleshoot these issues and successfully access your BIOS.
Overcoming Fast Startup Challenges
One of the common challenges in accessing BIOS is the fast startup feature found in many modern computers. This feature is designed to reduce the boot time, but it can sometimes be too quick for you to press the BIOS access key. Here’s how you can handle this:
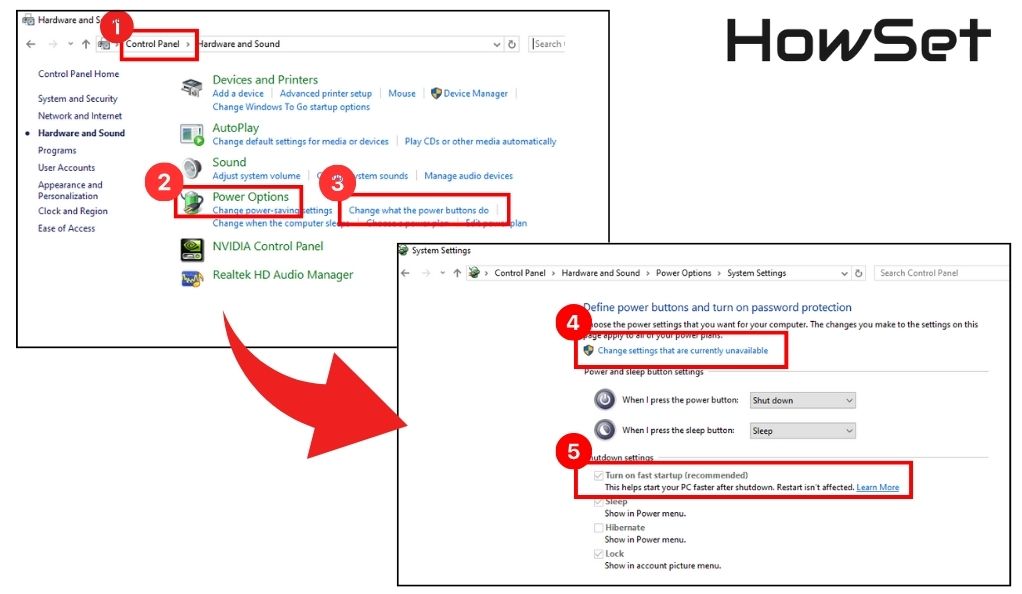
1. Disable Fast Startup in Windows:
- Go to ‘Control Panel’ and select ‘Power Options’.
- Click on ‘Choose what the power buttons do’.
- Select ‘Change settings that are currently unavailable’.
- Uncheck the box that says ‘Turn on fast startup (recommended)’.
- Save the changes and restart your computer.
2. Try to Access BIOS Again: After disabling fast startup, restart your computer and immediately press the BIOS access key. You might have a bit more time to press the key now.
What to Do When Standard Keys Don’t Work
If you’ve tried the standard keys for your computer brand and they don’t seem to work, here are some alternative methods to access BIOS:
1. Check for Alternate Keys:
- Sometimes, manufacturers assign more than one key for BIOS access. Check your computer’s manual or the manufacturer’s website for alternate keys.
2. Reset Your CMOS:
- As a last resort, you can reset your computer’s CMOS to restore the BIOS to its default settings. This can sometimes help in accessing BIOS.
- To reset CMOS, you can either use a jumper on your motherboard (mostly in desktops) or remove and reinsert the CMOS battery.
3. Use Windows Advanced Startup:
- If you’re using Windows 8 or 10, you can access BIOS through the advanced startup option.
- Go to ‘Settings’, then ‘Update & Security’, and select ‘Recovery’.
- Under ‘Advanced startup’, click ‘Restart now’.
- After your computer restarts, choose ‘Troubleshoot’, then ‘Advanced options’, and finally ‘UEFI Firmware Settings’ to restart into BIOS.
By following these troubleshooting steps, you should be able to resolve the common issues faced while trying to access BIOS.
Navigating Inside the BIOS
Once you’ve successfully accessed the BIOS, you’ll find yourself in a new environment full of settings and options that control how your computer operates. Navigating through BIOS might seem daunting at first, especially with its different menus and options. However, understanding the basics can make it a lot easier. Let’s explore the common elements you’ll encounter inside the BIOS and how to make safe changes.
Understanding BIOS Menu Options
The BIOS menu can vary depending on your computer’s manufacturer, but there are some common options you’re likely to find:
1. Boot Order:
- This lets you set the order in which your computer checks devices for the boot sequence. For example, you can set it to boot from a USB drive first, rather than the hard drive.
2. Date and Time:
- Here, you can adjust your computer’s internal clock.
3. Security Settings:
- This section allows you to set or change passwords for accessing the BIOS or the computer itself.
4. System Information:
- This shows details about your computer, like the CPU type and the amount of RAM installed.
5. Save and Exit:
- After making changes, you’ll use this option to save them and exit the BIOS.
Each option in the BIOS serves a specific purpose. It’s good to know what each one does, but if you’re unsure about something, it’s better to leave it as is or look up more information.
Making Safe Changes in BIOS
When making changes in the BIOS, it’s important to be cautious. Here are some tips for safe adjustments:
- Understand Before You Change: Make sure you understand what a setting does before you change it. If you’re unsure, it’s best to leave it as is or do some research.
- One Change at a Time: If you’re making multiple changes, do them one at a time. This way, if something goes wrong, you’ll know what caused it.
- Take Notes: Write down the original settings before you change them. This can be helpful if you need to revert back.
- Use Defaults: If you run into trouble, most BIOS menus have an option to reset to default settings. This can often fix problems caused by incorrect settings.
Navigating and adjusting settings in the BIOS might seem complex, but with a bit of knowledge and caution, it can be straightforward. Remember, the BIOS is a powerful tool, and with great power comes great responsibility. Use it wisely!
Updating and Maintaining BIOS
Keeping your computer’s BIOS up-to-date is just as important as any other maintenance you perform on your device. A current BIOS can ensure your computer operates smoothly and is compatible with various hardware and software. Let’s explore when and how to update your BIOS, and some best practices for keeping it well-maintained.
How and When to Update Your BIOS
Updating your BIOS can seem intimidating, but it’s a crucial step in maintaining your computer’s health. Here’s when and how you can do it:
When to Update BIOS:
- Compatibility: Update your BIOS if you’re installing new hardware that the current BIOS does not support.
- Security Updates: Sometimes, updates are released to fix security vulnerabilities.
- Performance Improvements: BIOS updates can also bring performance enhancements.
Steps for Updating BIOS:
1. Check Your Current BIOS Version: You can usually find this information in the BIOS menu under ‘System Information’.
2. Find the Latest BIOS Update:
- Visit your computer manufacturer’s website.
- Look for BIOS updates specific to your computer model.
3. Download and Install the Update:
- Follow the manufacturer’s instructions for downloading and installing the update.
- This might involve running an executable file in Windows or rebooting with a USB drive inserted.
4. Follow On-Screen Instructions: The update process will have on-screen prompts. Follow them carefully.
5. Restart Your Computer: Once the update is complete, restart your computer.
Note: It’s important not to interrupt a BIOS update (like turning off your computer). Doing so can harm your computer.
BIOS Maintenance Best Practices
Maintaining your BIOS ensures that your computer runs efficiently. Here are some tips for optimal BIOS maintenance:
- Regular Checks: Periodically check for BIOS updates. This keeps your system up-to-date with the latest fixes and features.
- Back Up Settings: Before updating, note down your current BIOS settings. If an update changes something, you can revert back to your preferred settings.
- Power Stability: Ensure a stable power supply during updates. A power interruption during a BIOS update can cause significant issues.
- Consult Experts: If you’re unsure about updating the BIOS, it’s wise to consult a tech expert or the computer manufacturer’s support.
By following these steps and tips, you can effectively update and maintain your computer’s BIOS, ensuring that your system stays in good health and runs smoothly. This completes our comprehensive guide on how to enter, navigate, and manage your PC’s BIOS. Remember, a little knowledge goes a long way in keeping your computer running at its best!

Conclusion
Understanding and navigating your computer’s BIOS is a crucial skill for ensuring optimal performance and security. This guide has equipped you with the knowledge to access BIOS using specific keys based on your computer’s brand, troubleshoot common access issues, and confidently navigate through BIOS settings. We emphasized the importance of updating the BIOS for compatibility and performance enhancements, while also highlighting the need for cautious and informed adjustments within the BIOS. Remember, regular maintenance and careful updates are key to a healthy computer system. While BIOS may appear daunting at first, with these insights and careful steps, you can manage it effectively, ensuring your computer’s smooth and efficient operation.