Optimize Your PC Settings for Enhanced Performance
In the fast-paced digital age, a slow and sluggish computer can be a major roadblock to productivity and an aggravating source of frustration. Whether you use your computer for work, gaming, or simple day-to-day tasks, a slow machine can test your patience and limit your capabilities. The good news is that you don’t need to rush out and buy a brand-new computer to enjoy better performance. Instead, you can optimize your PC settings to breathe new life into your existing machine.
This article is your comprehensive guide to unlocking the full potential of your computer by optimizing its settings. We will explore various aspects of PC optimization, from cleaning up your system and fine-tuning the operating system to optimizing hardware and software components. By the end of this guide, you’ll have the knowledge and tools to transform your sluggish PC into a smooth and responsive powerhouse.
Assessing Your PC
Before diving into the nitty-gritty of PC optimization, it’s essential to assess the current state of your computer. Understanding your system’s specifications and performance bottlenecks is the first step towards effective optimization.
Checking System Specifications
- Processor (CPU): Start by identifying your CPU model and its clock speed. This information gives you an idea of your computer’s processing power. You can find this information in the “System” section of your computer’s settings or by right-clicking on “My Computer” and selecting “Properties.”
- RAM (Memory): Determine the amount of RAM installed on your computer. Insufficient RAM can lead to performance issues, especially when running multiple applications simultaneously. Check the “System” section in your computer’s settings to find the RAM details.
- Storage Drive: Identify the type of storage drive your computer uses. Traditional Hard Disk Drives (HDDs) are slower compared to Solid-State Drives (SSDs). Knowing your storage type can help you decide if an upgrade is necessary.
- Graphics Card (GPU): If you use your computer for gaming or graphics-intensive tasks, check your GPU specifications. You can find this information in the “Device Manager” under “Display Adapters.”
- Operating System: Note down the version of your operating system, whether it’s Windows, macOS, or Linux. Different OS versions have varying system requirements.
Performance Assessment
- Speed Test: Run a speed test to check your internet connection. Slow internet can sometimes be mistaken for a slow computer.
- Task Manager: Open the Task Manager (Ctrl + Shift + Esc or Ctrl + Alt + Delete and select “Task Manager”) to view active processes and their resource usage. Look for CPU, RAM, and disk usage percentages to identify resource-hungry tasks.
- Benchmarking Tools: Consider using benchmarking software like UserBenchmark or PassMark to assess your computer’s performance relative to similar systems.
By assessing your PC’s specifications and performance, you’ll gain valuable insights into which areas require optimization. Whether it’s upgrading hardware components or fine-tuning software settings, this information will guide your optimization efforts effectively.
Cleaning Up Your PC
Now that you have a clear understanding of your PC’s specifications and performance, it’s time to prepare your computer for optimization by cleaning up unnecessary clutter. Over time, your computer accumulates files, applications, and temporary data that can slow it down. Here’s how to clean up your PC:
Disk Cleanup

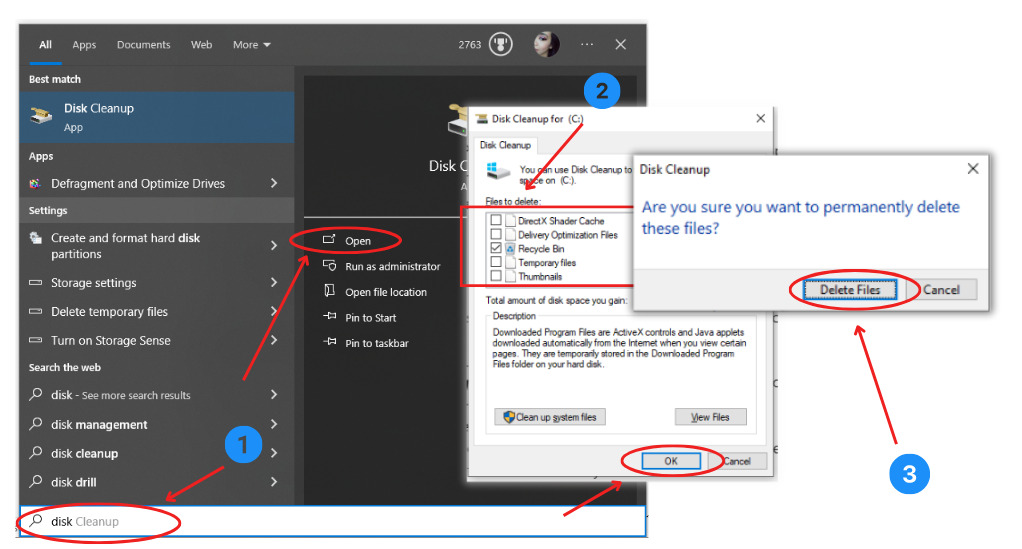
Disk Cleanup is a built-in Windows utility that helps you remove temporary files, system files, and other unnecessary data from your computer. Here’s how to use it:
- Press the Windows key and type “Disk Cleanup.” Click on the app when it appears in the search results.
- Select the drive you want to clean (usually the C: drive).
- Disk Cleanup will calculate how much space you can free up. Check the boxes next to the types of files you want to delete, such as Temporary Internet Files and Recycle Bin.
- Click “OK” and then “Delete Files” to remove the selected files.
Uninstall Unused Applications
Over time, you may have installed applications that you no longer use. Uninstalling them can free up space and resources. Here’s how to uninstall applications:
- Open the Control Panel on your computer.
- Click on “Programs” or “Programs and Features.”
- Select the application you want to uninstall and click “Uninstall.”
- Follow the on-screen instructions to complete the uninstallation process.
Organize Your Files
Take some time to organize your files and folders. Delete or move files that you no longer need, and consider using cloud storage services to free up space on your local drive.
Remove Startup Programs
Many applications launch automatically when you start your computer, which can slow down the boot time. You can manage startup programs in Windows:
- Press Ctrl + Shift + Esc to open Task Manager.
- Go to the “Startup” tab to see a list of programs that start with Windows.
- Right-click on programs you don’t need to start with Windows and select “Disable.”
Defragment Your Hard Drive
If you’re using a traditional Hard Disk Drive (HDD), defragmenting it can help improve performance. Windows has a built-in defragmentation tool:
- Type “Defragment” in the Windows search bar and open the “Defragment and Optimize Drives” app.
- Select your HDD drive and click “Optimize.”
This step of cleaning up your PC sets the stage for more advanced optimization techniques. In the next sections, we’ll explore optimizing your operating system, hardware, and software for enhanced performance.
Operating System Optimization
Optimizing your operating system is a crucial step in boosting your PC’s performance. The operating system acts as the backbone of your computer, managing resources and facilitating the execution of tasks. Here’s why optimizing the operating system matters:
Why Optimize the Operating System?
- Improved Responsiveness: An optimized operating system responds more swiftly to user commands, reducing lag and delays.
- Efficient Resource Management: Optimization ensures that your OS efficiently utilizes available CPU, RAM, and disk resources.
- Enhanced Stability: A well-tuned OS is less prone to crashes and freezes, providing a more stable computing experience.
Now, let’s delve into some practical tips for optimizing your operating system for speed and efficiency:
Tips for Operating System Optimization
- Keep Your OS Updated: Ensure that your operating system is up to date with the latest security patches and performance improvements. Operating system updates often include bug fixes and optimizations.
- Adjust Visual Effects: Windows users can adjust visual effects to prioritize performance over aesthetics. To do this, right-click on “My Computer,” select “Properties,” click on “Advanced system settings,” and under the “Advanced” tab, click “Settings” under the “Performance” section. Choose the “Adjust for best performance” option.
- Disable Unnecessary Startup Services: Many background services start with your operating system, consuming valuable resources. Review the list of startup services and disable those you don’t need.
- Manage Virtual Memory: Adjust the virtual memory settings to optimize performance. In Windows, you can do this by right-clicking on “My Computer,” selecting “Properties,” going to the “Advanced” tab, and clicking on “Settings” under the “Performance” section. In the “Advanced” tab of the new window, click “Change” under the “Virtual memory” section.
- Use High-Performance Power Plan: If you’re using a laptop, ensure that you’re using the “High-Performance” power plan to maximize system performance. You can change the power plan in the Control Panel under “Power Options.”
By implementing these operating system optimization tips, you can fine-tune your computer’s performance and make it more responsive to your needs. In the next section, we’ll explore hardware optimization techniques to further enhance your PC’s capabilities.
Hardware Optimization

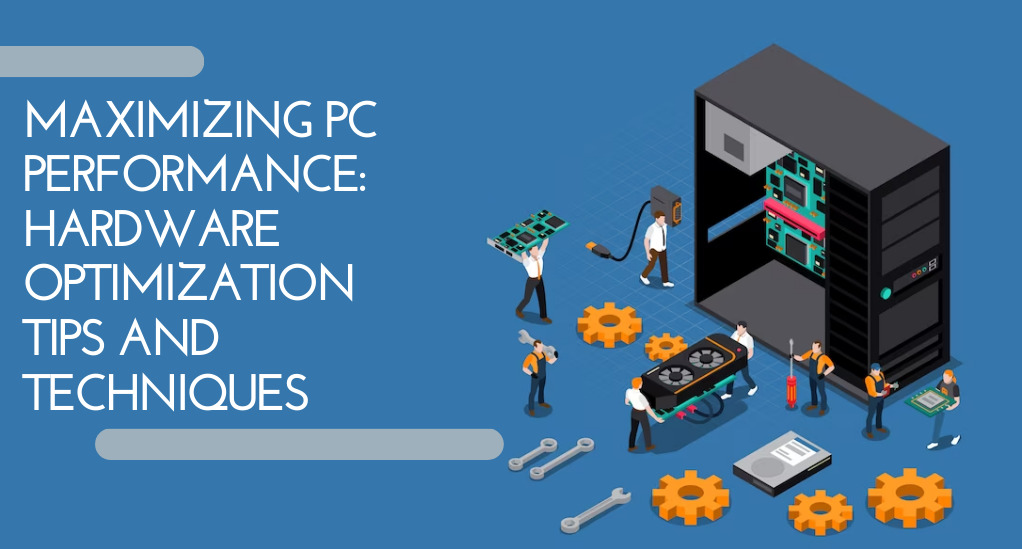
Hardware optimization is a critical aspect of enhancing your PC’s performance. Your computer’s hardware components, such as the CPU, RAM, storage drive, and GPU, play a pivotal role in determining its speed and responsiveness. In this section, we’ll explore hardware-related tweaks and optimization options to make your computer run faster and smoother.
Why Hardware Optimization Matters
Optimizing your hardware can lead to significant performance improvements. Here’s why it matters:
- Faster Processing: Upgrading or optimizing hardware components can result in faster data processing, reducing wait times for tasks to complete.
- Enhanced Multitasking: Adequate RAM and CPU power enable smoother multitasking, allowing you to run multiple applications simultaneously without slowdowns.
- Better Gaming Performance: Gamers can achieve higher frame rates and smoother gameplay by optimizing GPU settings and hardware.
Now, let’s discuss some hardware optimization options:
Upgrading RAM
One of the most effective ways to boost your computer’s performance is by upgrading its RAM. RAM (Random Access Memory) is where your computer temporarily stores data that it’s actively using. More RAM allows your computer to handle larger amounts of data and run multiple applications smoothly.
To upgrade your RAM:
- Determine the maximum RAM capacity your motherboard supports.
- Purchase compatible RAM modules.
- Power off your computer, open the case, and locate the RAM slots on your motherboard.
- Remove the old RAM sticks (if necessary) and install the new ones.
- Close the case, power on your computer, and ensure the RAM is recognized in the system settings.
SSD Installation
Replacing your traditional Hard Disk Drive (HDD) with a Solid-State Drive (SSD) can provide a significant speed boost. SSDs are faster, more reliable, and quieter than HDDs. They can drastically reduce boot times and application loading times.
Tips for Software Optimization
One of the key aspects of software optimization is managing the programs that launch automatically when your computer starts up. These startup programs can significantly impact boot times and use valuable system resources. By reviewing and controlling which programs start with your computer, you can improve startup speed and overall performance.
Here’s how to manage startup programs in Windows:
- Open Task Manager: Press Ctrl + Shift + Esc to open Task Manager.
- Navigate to the Startup Tab: In Task Manager, go to the “Startup” tab. You’ll see a list of programs that launch at startup.
- Disable Unnecessary Programs: Review the list and identify programs that you don’t need to start with Windows. These can include auto-updaters, utility programs, and other non-essential software.
- Right-Click and Disable: Right-click on the program you want to disable and select “Disable.” This action prevents the program from launching automatically during startup.
It’s important to exercise caution when disabling startup programs. Some programs are necessary for your computer to function correctly. If you’re unsure about a particular program, it’s a good idea to research it online before disabling it. Additionally, periodically revisiting your startup programs to keep them streamlined is a proactive way to maintain a responsive PC.
Advanced Techniques

For power users and enthusiasts looking to squeeze every ounce of performance out of their PC, advanced techniques and tweaks can make a significant difference. These techniques go beyond the basics and allow you to fine-tune your computer for maximum speed and efficiency. Here are some advanced techniques to consider:
Overclocking
Overclocking involves pushing your CPU or GPU beyond their factory-set clock speeds to achieve higher performance. It’s a powerful technique but should be approached with caution, as it can generate more heat and potentially reduce component lifespan. Overclocking typically involves adjusting settings in the BIOS or using overclocking software provided by your component manufacturer.
Before overclocking, research your specific CPU or GPU model and follow step-by-step guides to ensure a safe and stable overclock. Monitor temperatures and stability to prevent overheating or system crashes.
Customizing Power Plans
Windows provides power plans that control how your computer uses energy. While the default “Balanced” plan balances performance and energy consumption, you can create custom power plans to tailor your PC’s behavior to your needs.
To customize power plans:
- Open the Control Panel and go to “Hardware and Sound” > “Power Options.”
- Click on “Create a power plan” on the left sidebar.
- Choose a base plan (e.g., “High Performance”) and customize settings such as when the display turns off and when the computer goes to sleep.
- Save your custom power plan and switch to it for optimized performance.
Cleaning and Cooling
Effective cooling is crucial for maintaining optimal performance, especially when overclocking. Ensure that your computer’s cooling system, including fans and heat sinks, is clean and free of dust and debris. Proper cable management can also improve airflow.
Consider upgrading to a more efficient cooling solution, such as a larger CPU cooler or additional case fans, to keep temperatures in check.
Advanced Graphics Settings
If you’re a gamer, explore advanced graphics settings in games and graphics driver software. Adjusting settings like anti-aliasing, texture quality, and resolution can have a significant impact on gaming performance. Experiment with different settings to find the right balance between visuals and performance.
Registry Tweaks
Advanced users can make registry tweaks to fine-tune Windows settings. However, editing the Windows registry requires caution, as incorrect changes can lead to system instability. Create a backup of your registry before making any tweaks, and only make changes if you understand the implications.
These advanced techniques can unleash the full potential of your PC, but they also come with risks and require careful monitoring. If you’re not comfortable with these techniques, consider seeking guidance from experienced users or professionals.
Testing and Monitoring
The process of optimizing your PC doesn’t end with making changes to settings and hardware. It’s crucial to regularly test and monitor your PC’s performance to ensure that your optimizations are delivering the desired results and that your computer is running smoothly. Here’s why testing and monitoring are essential:
Emphasizing the Importance of Testing
- Performance Validation: Testing allows you to verify that your optimizations have improved your PC’s performance. It provides tangible evidence of the impact of your changes.
- Issue Identification: Testing can uncover any new performance issues or bottlenecks that may arise after optimization. Identifying these issues early allows for prompt resolution.
- Optimization Assessment: Regular testing helps you assess the long-term effectiveness of your optimization efforts. It ensures that your PC maintains its improved performance over time.
Tools for Monitoring and Benchmarking
To effectively test and monitor your PC’s performance, consider using the following tools:
- Task Manager: The built-in Task Manager in Windows provides real-time information about CPU, RAM, and disk usage. It’s a valuable tool for monitoring resource consumption and identifying performance-hungry processes.
- Performance Monitor: Performance Monitor, also known as PerfMon, is a Windows utility that offers in-depth performance data. You can create custom performance counters to track specific aspects of your PC’s performance.
- Benchmarking Software: Benchmarking tools like UserBenchmark, PassMark, and 3DMark are excellent for comparing your PC’s performance to other systems and assessing its performance in various tasks, including gaming, rendering, and general computing.
- Temperature Monitoring: Overheating can lead to performance issues and hardware damage. Use temperature monitoring software like HWMonitor or Core Temp to keep an eye on CPU and GPU temperatures.
- Event Viewer: Event Viewer logs system events and errors, providing insights into any issues that may affect performance. It can help you diagnose and resolve underlying problems.
By regularly testing your PC’s performance and using monitoring tools, you can ensure that your optimizations are effective, and your computer continues to deliver the enhanced performance you desire.
Conclusion
In conclusion, optimizing your PC settings is the key to unlocking its full potential. By assessing your computer’s specifications, cleaning up clutter, and fine-tuning software and hardware, you can enjoy a faster and more efficient computing experience. Whether you’re a casual user or a power user, the strategies discussed in this guide offer a range of solutions to cater to your needs. Don’t let a sluggish PC hold you back; take action today to transform your machine into a responsive powerhouse.
Remember that PC optimization is not a one-time task but an ongoing process. Regular testing and monitoring ensure that your optimizations continue to deliver the desired results. With the knowledge and tools provided in this guide, you have the means to take control of your computer’s performance and enjoy a smoother and more productive digital journey. Unleash the true potential of your PC and let it empower your daily tasks, gaming adventures, and creative pursuits.


Leave a Reply