How to Turn Off In-Game Notifications During Live Streaming
Live streaming has become a popular way to share gaming experiences with others. It lets you connect with friends and followers in real-time. For a smooth and engaging stream, it’s important to keep interruptions to a minimum.
When the stream is seamless, viewers are more likely to stay and enjoy the content. A steady and uninterrupted stream helps you build a loyal audience who look forward to your gaming sessions.
In-game notifications can be a real hassle during live streaming. They often pop up at the worst moments, covering important parts of the game screen. This can distract you and your viewers, making it harder to enjoy the game.
Some common problems caused by these notifications include blocking critical game information, distracting you during intense gameplay, and annoying your viewers with constant pop-ups.
These interruptions can make your stream less enjoyable and professional. By disabling in-game notifications, you can keep your stream smooth and engaging, giving your audience the best experience possible.
Understanding In-Game Notifications
In-game notifications are a crucial part of modern gaming, designed to enhance the player’s experience by keeping them informed and connected. However, these alerts can sometimes disrupt the flow of gameplay, especially during live streaming sessions. By understanding what these notifications are, why they appear, and their impact, you can manage them better and ensure a smoother gaming experience.
What Are In-Game Notifications?
In-game notifications are alerts that appear on your screen while you are playing a game. These notifications can include various types of messages:
- Friend Requests: Alerts when someone adds you as a friend.
- Messages: Notifications about new messages from friends or other players.
- Game Updates: Information about game events, updates, or promotions.
- Invitations: Alerts when you are invited to join a multiplayer game or party.
These notifications are meant to keep you informed about important activities and changes within the game and your gaming community without having to exit the game.
Why They Appear During Gameplay
The primary reason these notifications appear during gameplay is to ensure that you stay updated on important events and messages. For example:
- If a friend sends you a message or an invite, the notification pops up immediately so you can respond without missing out.
- Game updates or event notifications keep you aware of new content or activities within the game.
These notifications are designed to provide real-time updates, helping you stay connected and engaged with both the game and your friends.
The Impact of Notifications on Live Streaming
While in-game notifications are helpful for staying connected, they can be highly disruptive during live streaming:
- Screen Obstruction: Notifications can block critical parts of the game screen, making it difficult for viewers to see the action clearly.
- Distractions: They can distract you from the game, causing mistakes or missed opportunities during intense gameplay moments.
- Viewer Annoyance: Frequent pop-ups can be annoying for viewers, leading to a less enjoyable streaming experience.

To maintain a smooth and professional stream, it’s important to manage these interruptions by adjusting your notification settings. This ensures that your audience enjoys an uninterrupted and engaging viewing experience.
Accessing Xbox Game Bar Settings
To manage your in-game notifications effectively, you first need to access the Xbox Game Bar settings. The Xbox Game Bar provides a central hub where you can adjust various game-related settings to enhance your gaming and streaming experience. Here’s a simple guide to help you open and navigate the Xbox Game Bar settings.
Step-by-Step Guide to Open Xbox Game Bar
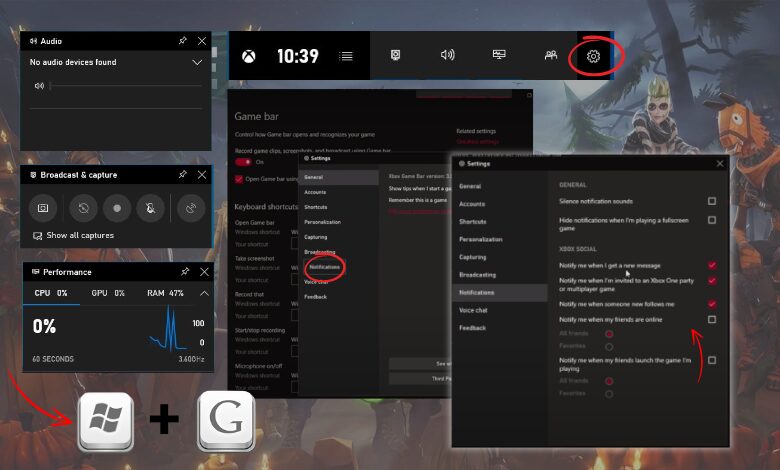
- Open the Xbox Game Bar: Press the
Win + Gkeys on your keyboard at the same time. This shortcut will open the Xbox Game Bar overlay on your screen. - Locate the Settings Menu: In the Game Bar overlay, look for the gear icon. This is usually located at the top of the screen or in the sidebar. Click on this gear icon to open the settings menu.
- Navigate Through Settings: Once in the settings menu, you will see various options. To manage notifications, click on the “Notifications” tab. Here, you can customize how and when notifications appear during your gameplay.
By following these steps, you can easily access and adjust your Xbox Game Bar settings, helping you control in-game notifications and improve your live streaming experience.
Managing Notification Settings
Once you have accessed the Xbox Game Bar settings, the next step is to manage your notification settings. Adjusting these settings will help you minimize interruptions and create a better gaming and streaming experience. Here’s how to navigate to the Notifications tab and a detailed explanation of the notification settings available.
Navigating to the Notifications Tab
To find the Notifications tab in the Xbox Game Bar settings:
- Open the Settings Menu:
If you haven’t already, pressWin + Gto open the Xbox Game Bar. Then, click on the gear icon to access the settings menu. - Find the Notifications Tab:
In the settings menu, look for the “Notifications” tab. Click on it to open the notification settings.
Detailed Explanation of Notification Settings
In the Notifications tab, you will see several options to customize your notifications:
- Silence Notification Sounds: Enable this option to mute all notification sounds. This helps to keep your gaming and streaming sessions quiet and free from distractions.
- Hide Notifications When Playing in Fullscreen: This setting hides all notifications when you are playing a game in fullscreen mode. It prevents notifications from popping up and blocking important parts of the game screen.
- Customize Specific Notifications: You can also customize notifications for different types of alerts, such as messages, friend requests, and game invites. Choose which notifications you want to see and which ones to hide.
Adjusting these settings allows you to control when and how notifications appear, creating a smoother and more professional live streaming experience.
Customizing Xbox Social Notifications
Customizing social notifications in the Xbox Game Bar allows you to control which alerts you receive, helping you stay focused during your gaming sessions and live streams. By fine-tuning these settings, you can ensure that only the most important notifications interrupt your gameplay. Here’s a detailed guide on how to customize your social notifications effectively.
How to Customize Social Notifications
- Open Xbox Game Bar:
- Start by pressing
Win + Gto open the Xbox Game Bar overlay on your screen.
- Start by pressing
- Access the Settings Menu:
- Click on the gear icon to enter the settings menu.
- Navigate to the Notifications Tab:
- Within the settings menu, click on the “Notifications” tab to view and manage notification settings.
- Customize Social Notifications:
- In the Notifications tab, locate the “Xbox Social” section. Here, you will find several options to customize your social notifications:
- New Message Alerts:
- Enable or disable notifications for new messages. This allows you to decide whether you want to be notified when friends send you messages during gameplay.
- Game Invites:
- Choose whether to receive alerts when someone invites you to join a multiplayer game or party. Turning this off can help you avoid interruptions when you are focused on a single-player game or live streaming.
- Friend Activity:
- Decide if you want to be notified when your friends come online or start playing the same game as you. This can be useful for coordinating gameplay but can be distracting if you prefer uninterrupted sessions.
- Followers:
- Manage notifications for new followers. You can choose to be alerted when someone new follows you, which is great for building your community but might not be necessary during intense gameplay moments.
- New Message Alerts:
- In the Notifications tab, locate the “Xbox Social” section. Here, you will find several options to customize your social notifications:
Adjust these settings to tailor your Xbox Game Bar notifications to your preferences, ensuring a smoother and more enjoyable gaming and streaming experience.
Additional Tips for a Smooth Streaming Experience
To ensure your live streaming sessions are as smooth and engaging as possible, it’s essential to fine-tune various settings and optimize your setup. Here are some additional tips that can help you achieve a seamless streaming experience.
Other Settings to Consider Adjusting
- Adjust Game Graphics Settings: Lowering the graphics settings in your game can significantly reduce the load on your computer’s CPU and GPU. This helps prevent lag and ensures your gameplay remains fluid. Opt for medium or low settings if you experience performance issues.
- Limit Background Applications: Close unnecessary applications running in the background, such as web browsers, music players, and other software. These applications consume system resources that can otherwise be allocated to your game and streaming software.
- Optimize Network Settings: Use a wired Ethernet connection instead of Wi-Fi to ensure a stable and fast internet connection. This minimizes latency and reduces the chances of your stream dropping. Also, make sure to prioritize your streaming device on your network settings to ensure it gets the necessary bandwidth.
Tips for Optimizing Your Streaming Setup
- Use Quality Streaming Software: Choose reliable streaming software like OBS Studio, Streamlabs OBS, or XSplit. These programs offer a range of features, including customizable overlays, scenes, and audio settings, which can enhance your stream’s quality.
- Configure Your Stream Settings: Set your resolution and bitrate according to your internet speed and computer capabilities. For example, if you have a slower internet connection, a lower resolution (720p) and bitrate (2500-3500 kbps) might be more suitable. Experiment with different settings to find the best balance between quality and performance.
- Test Your Setup Before Going Live: Run a test stream to ensure everything is working correctly. Check your audio levels, video quality, and game performance. This practice helps identify and fix potential issues before you go live, providing a smoother experience for your viewers.
- Engage with Your Audience: Interaction is key to building a loyal audience. Use a secondary monitor or device to keep an eye on the chat and respond to comments and questions. Engaging with your viewers makes your stream more enjoyable and helps foster a sense of community.
- Use a Dedicated Streaming PC: If possible, use a separate computer for streaming. This setup allows one PC to handle the game while the other manages the stream, reducing the performance load on both systems and ensuring a smoother experience.
By implementing these additional tips, you can create a professional and engaging live streaming environment. This not only enhances the viewing experience for your audience but also makes your streaming sessions more enjoyable and efficient.
Conclusion
Disabling in-game notifications is a key step to enhance your live streaming experience. By accessing the Xbox Game Bar settings and customizing your notification preferences, you can ensure that your gameplay remains uninterrupted. Additionally, optimizing your streaming setup by adjusting graphics settings, closing background applications, and ensuring a stable internet connection further improves the quality of your stream. Engaging with your viewers and maintaining a smooth, professional stream helps build a loyal audience. Taking these steps creates a more enjoyable and seamless streaming experience for both you and your viewers.
Leave a Reply