Trouble with Windows 10 Safe Mode? Here’s the Solutions:
Safe Mode in Windows 10 is a specialized, limited state of the operating system. It’s a bit like the safe zone in a complex game – a place where you can sort out problems without the usual risks. When you boot your computer in Safe Mode, Windows loads only the essential drivers and services. This means that if there’s a problem with a driver or a conflict with a new piece of software, Safe Mode provides a secure environment to troubleshoot and resolve these issues.
Overview of Safe Mode
- Minimalist Approach: In Safe Mode, Windows strips down to its basics. You won’t see fancy graphics or have access to all your apps. It’s all about functionality over form.
- Troubleshooting Haven: Since only the essentials are running, it’s easier to isolate problems. You can identify if the issue is caused by something you’ve installed or a deeper system error.
- Limited Connectivity: Be aware that in Safe Mode, you might not be able to connect to the internet unless you choose the ‘Safe Mode with Networking’ option.

Importance for Troubleshooting and System Maintenance
- Problem Identification: If your computer is acting up – running slow, crashing, or behaving erratically – booting in Safe Mode can help you determine whether the issue is software or hardware-related.
- Security Scans: Safe Mode is ideal for running antivirus scans as it prevents malware from hiding behind active processes.
- System Restoration: In the event of major system issues, Safe Mode allows you to access system restore points, undoing recent changes that might be causing problems.
Entering Safe Mode: Step-by-Step Guide
Entering Safe Mode in Windows 10 can be done in several ways, depending on whether you have access to Windows or not. Here’s a straightforward guide to help you navigate this process.
From Within Windows
For situations where you can start Windows normally but still need to troubleshoot, you can initiate Safe Mode directly from within your active Windows session. This approach is handy when dealing with non-critical errors or performing regular maintenance checks.
Accessing Recovery Options
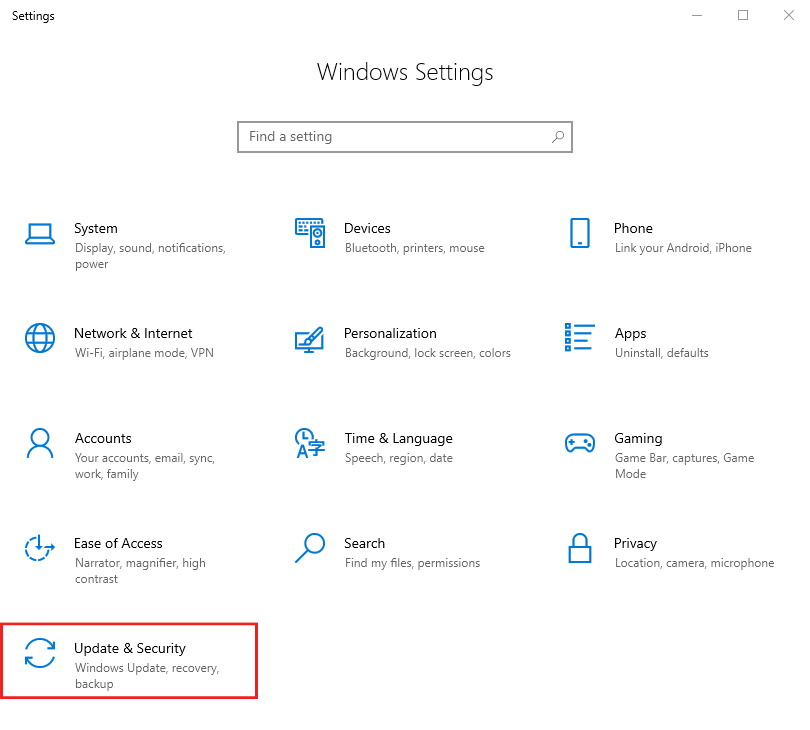
- Start by clicking the ‘Start’ button, then select ‘Settings.’


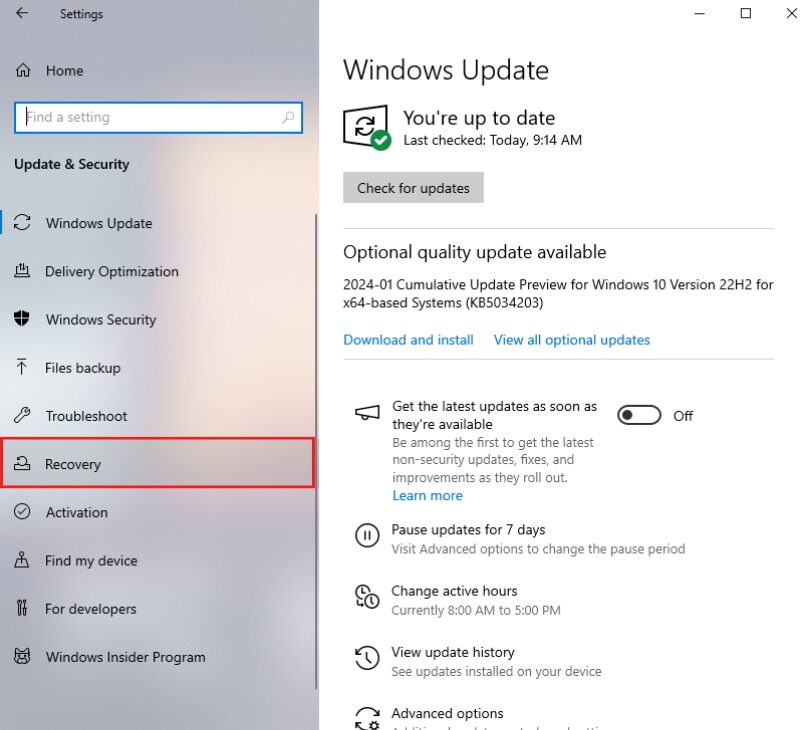
- Navigate to ‘Update & Security’ and click on ‘Recovery.’

- Under ‘Advanced startup,’ you’ll find the option to ‘Restart now.’ Click this to proceed.
Navigating to Advanced Startup
- After the restart, your computer will present a menu titled ‘Choose an option.’

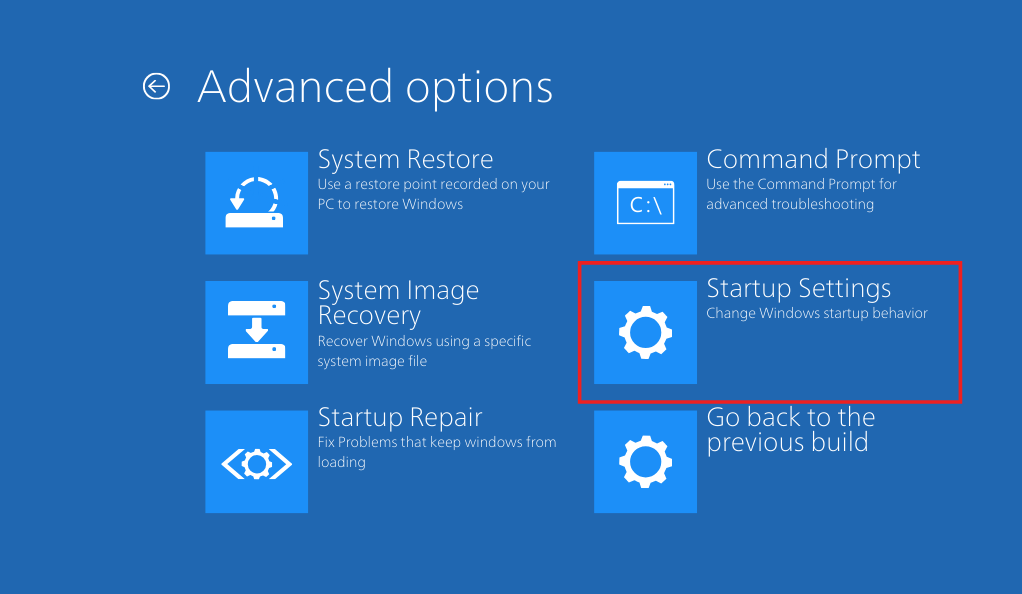
- Click ‘Troubleshoot,’ then ‘Advanced options,’ and finally, ‘Startup Settings.’


- Click ‘Restart’ on the Startup Settings screen. Your computer will reboot and offer various startup options.
From the Sign-In Screen
If you’re unable to start Windows normally, there’s a convenient option to enter Safe Mode right from the sign-in screen. This method is especially useful when you can’t access the desktop due to system issues.
Utilizing the Shift Key Method
- If you can’t boot to Windows, turn on your PC and wait for the sign-in screen.

- Hold down the ‘Shift’ key on your keyboard and, while holding it, click the ‘Power’ button on the screen and then select ‘Restart.’
Safe Mode Variants
Safe Mode in Windows 10 comes in different flavors, each serving a unique purpose:
Safe Mode with Networking
- This variant includes the basic functionalities of Safe Mode but adds internet connectivity.
- It’s ideal for downloading drivers or updates that might be needed to fix your issue.
Safe Mode with Command Prompt
- For more advanced troubleshooting, this version replaces the standard Windows interface with a Command Prompt window.
- It’s mainly used by IT professionals or those with more technical expertise.
Safe Mode Entry: Pre-Boot Methods
Sometimes, you might not be able to access Windows normally. In such cases, there are alternative methods to enter Safe Mode before your PC fully boots. These pre-boot options can be particularly useful if your system is experiencing severe issues that prevent regular startup.
Utilizing System Recovery Options
When your PC won’t start normally, System Recovery Options are vital. They offer a way to access Safe Mode and other tools, even if you can’t reach the Windows desktop. This safety net is essential for fixing severe system problems or when standard Safe Mode access methods aren’t working.
Accessing through BIOS
- Restart your computer and repeatedly press the key to enter BIOS settings (commonly F2, F10, Del, or Esc).
- Look for a tab that says ‘Boot’ and change the boot order so that your PC starts from a recovery drive or installation media, if available.
Navigating Startup Settings


- Once booted from the recovery drive or installation media, choose your language and other preferences.
- Select ‘Repair your computer’ > ‘Troubleshoot’ > ‘Advanced options’ > ‘Startup Settings,’ and then click ‘Restart.’
- Upon restart, you’ll see options for Safe Mode.
Advanced Boot Options for Professional Use
For users with more technical expertise or IT professionals, there are advanced methods to access Safe Mode:
Command Prompt Techniques
- From the ‘Advanced options’ in the recovery environment, you can select ‘Command Prompt.’
- Use commands like bcdedit /set {default} safeboot minimal to set up Safe Mode boot.
Custom Boot Configurations
- This method involves modifying boot settings via the Command Prompt to tailor the Safe Mode experience according to specific needs.
Troubleshooting Common Issues in Safe Mode
Once you’re in Safe Mode, you can start troubleshooting the common issues that might be affecting your Windows 10 PC. Safe Mode limits the functions of your computer, so it’s easier to isolate and solve problems. Here’s how to make the most of Safe Mode for troubleshooting.

Identifying and Solving Driver Conflicts
- In Safe Mode, only essential drivers are loaded. If your PC runs smoother in Safe Mode, it’s likely that a driver is the cause of your issues.
- You can update, rollback, or uninstall drivers through the Device Manager to identify the problematic driver.
System Restoration and Error Correction
- Safe Mode is an excellent environment for running system restore. If a recent change (like a software installation) is causing trouble, you can roll back to an earlier system state.
- You can also use tools like Disk Cleanup and Check Disk in Safe Mode to fix errors and clean up your system.
Exiting Safe Mode
After you’ve finished troubleshooting in Safe Mode, you’ll need to know how to return your computer to its normal state. Exiting Safe Mode is generally straightforward, but there are a couple of methods you can use, depending on how you entered Safe Mode in the first place.
Standard Method via System Restart
- The most common way to exit Safe Mode is to simply restart your computer.
- Click on the ‘Start’ button, select the ‘Power’ icon, and choose ‘Restart.’ Your PC should boot up normally, exiting Safe Mode.

Using System Configuration (msconfig)
- If your PC keeps booting into Safe Mode, use the System Configuration tool to change the boot settings back to normal.
- Press Windows Key + R, type msconfig in the run box, and press Enter.
- Go to the ‘Boot’ tab, uncheck ‘Safe boot,’ click ‘Apply,’ and then ‘OK.’
- Restart your computer, and it should boot to the regular operating system.


Addressing Common Exit Issues
- If you’re having trouble exiting Safe Mode, ensure that you haven’t accidentally set Safe Mode as the default boot option.
- In rare cases, if the system is still stuck, you might need to consider system repair options or consulting a professional.
Tips for Efficient Safe Mode Usage
Using Safe Mode efficiently can save you a lot of time and hassle when troubleshooting your Windows 10 PC. Here are some valuable tips to ensure you get the most out of Safe Mode:
- Understand the Different Safe Mode Options: Know the difference between basic ‘Safe Mode’, ‘Safe Mode with Networking’, and ‘Safe Mode with Command Prompt’. Choose the one that best suits the problem you are trying to solve.
- Prepare for Limited Functionality: Remember that Safe Mode is a diagnostic environment with limited functionality. Don’t expect all your apps and features to work as they do in normal mode.
- Keep Your System Updated: Regularly updating Windows and your drivers can prevent many issues that might require Safe Mode to fix.
- Create a System Restore Point: Before making significant changes to your system, like installing new software or drivers, create a restore point. It can be a lifesaver if you need to undo changes in Safe Mode.
- Use Safe Mode for Regular Maintenance: Besides troubleshooting, Safe Mode is great for performing regular maintenance tasks like virus scans and disk cleanups, as fewer processes are running in the background.
- Seek Professional Help if Needed: If you’re unsure about what to do in Safe Mode, it might be best to consult a professional. Missteps in Safe Mode can sometimes lead to bigger issues.
Conclusion
Safe Mode in Windows 10 is an essential tool for diagnosing and fixing computer issues. It simplifies troubleshooting by limiting operations to basic functions, making it easier to identify and resolve problems. Whether you’re tackling driver conflicts, conducting system restorations, or performing routine maintenance, Safe Mode is a safe and effective environment for these tasks.
Understanding and using Safe Mode is a valuable skill in managing your PC’s health. The steps outlined in this article provide you with the knowledge to confidently use Safe Mode, ensuring your computer remains in optimal condition. Remember, a little knowledge goes a long way in maintaining a smooth computing experience.


Leave a Reply